Sky Island Generator Project Breakdown

Making Of / 02 April 2026

This post is a cross-post from my website blog, for more project breakdowns do pop over to my main website: https://www.jolchawa.site/


Introduction

Hello there welcome to my post about my craziest procedural generator yet! Inspired by Zelda Tears of the Kingdom presenting; Seasonal Sky Island Generator. In this post I put my Houdini skills to the test to create a dynamic island generator that covers island creation and placement and dives into the breakdown behind it.

Tool Origins

This tool was built because of my recent explorations into raymarching with clouds. I figured it would be fun to have islands accompanying the clouds and overall, a more completed scene to test out profiling my results. I also really loved Zelda Tears of the Kingdom and wanted to match that whimsical vibe.

Tool Development:

Development was a bit slower than anticipated with my planning due to my lecturing job taking up the majority of the week. However I made quick progress on weekends, focusing on creating the rocky structure and shaders side by side. I got some useful feedback from peers to reduce noise on the top and focus on buffing out the edges of the top face generation which helped it match the Zelda sky island more in design.

Spawning Set Dressing Rules:

I created a quick sketchover to better visualise where the points need to appear ontop of my first set of islands. This helped me troubleshoot where I needed extra logic to get rid of spawn points e.g. a group comparison of points intersecting the water plane to spawn lilypads. This automatically removed the points if water was switched off as none would overlap.

Seasons Mockup:

I studied the islands from Zelda TOTK and simplified the weathering effects that occur to work with my existing shaders. I did some simple paintovers in Photoshop to better fit the new rules of what had to be swapped out e.g. water becomes frozen in the winter variant or flowers should spawn in summer/spring.

Houdini Breakdown:

This video goes over the complete graph and explains the why behind the nodes I used to make the final island result. I highly recommend watching it before continuing.


Mesh Shaders for Unreal Engine

For the stone, I used vertex data baked from concavity, thickness and ambient occlusion in Houdini that was stored in the RGB channels. This allowed easy adjustment for colour variations in crevices and edge information.

As for general noise I used a tileable to create a result similar to Zelda Tears of the Kingdom with the exception of detailed normals for easier shading.

The water I experimented with using the opaque but still convincing single layer water blend mode in Unreal Engine as I knew I would have alpha overdraw on the lily pads that would spawn. By having an opaque material this reduced the result. The ice shader is very similar to my flat ice one created as part of my shader museum here: Shader Museum

As for the grass I wanted to use Runtime Virtual Textures (RVTS) to drive the colour however encountered a problem that when generating geometry as an HDA, the runtime switch would not toggle and would need to be manually adjusted. This made the grass spawn as black so I used an if node to have it fall back on a set colour if it could not find a VRT texture.

Bugs and Problem Solving:

There was a lot of bugs especially once converting my subnet into a HDA and dragging it into Unreal. References initially broke however I was easily able to fix it by exposing the string parameters. Some shaders broke due to UVS which I was able to fix by returning back to texture coordinate rather than texture bomb. I also changed how the waterfall generated as the original outputs made it generate from inside the water spawn point, but this caused too many issues with it weirdly looking like it came out of nowhere. The thickness changed too as panning around the island would make the water disappear due to its thinness which was unlike what I envisioned the game style to be able to do.

Instancing and Memory Profiling

As I was testing the execution of the HDA I noticed that each island ended up taking up a lot of memory and causing slowdown in large clusters. I used Unreal’s profiling tools to figure out the root cause, which ended up being mesh cost. Originally my generators would place meshes from a location on disk as this would allow me to swap out models easily and preview them in the viewport of Houdini. However, in engine the final models would get combined into one big unique final mesh, causing issues when lodding and bloating the memory cost. In total my islands took up 500 megs of memory for the static mesh cache alone which was insane, I knew that Unreal has fantastic instancing capabilities so I swapped out the mesh placement for my grass with an instance attribute that would call to the reference in the project. This created significant savings as the total memory cost of an island went down to around 90 megs. I repeated this for my foliage and rocks. One weird quirk I did notice was that the foliage instancing in particular had to have a separate output as merging them would confuse the foliage actor. During baking the data would also need to be deleted if undesired in the viewport at times. However, minus these weird quirks the performance boost was great when loading into a level full of islands. I know for further optimisation during runtime, LODS of the islands can bring down cost even further in geometry alongside mipmapping all the tiling textures to much lower resolution.

Project Reflection

Overall, this project was a lot of fun, and I have more confidence in visualising the process for creating various shapes in Houdini. Its also taught me how much math is involved in tech art, more than half of my logic relied on wrangles to get location data relying on radius data. I really love Houdibis detail panel you can just about translate any data across different graphs alongside into UE. The tool began as an investigation into raymarching which I did initially do but to be honest the majority of the original shader I had made was not created by me from scratch and so the project was less of a display of what I had learnt and more of what I could replicate. I still struggle to wrap my head around HLSL, but I will look into it in the future. Now the outcomes are made by me from scratch it gave me a great chance to combine all my favourite aspects of tech art, procedural tools and shaders! With Embark studios dropping their behind the scene breakdown of their chaos driven destructible house generator (check it out here) I will be moving into creating some buildings to learn more about that workflow. If I was to do this project again I would expose more parameters in the future about placement to allow overrides for artists to place trees and waterfalls where desired, however after generation this is still fully possible to do for more narrative driven set dressing. Stay tunes for more fun projects!

Bibliography

(HDRI) - Guest, J. (2025). Citrus Orchard Road (Pure Sky) HDRI • Poly Haven. [online] Poly Haven. Available at: https://polyhaven.com/a/citrus_orchard_road_puresky.

Lilypad’s - Quixel Bridge. “Rembrandt Water Lily.” Fab.com, 2024, www.fab.com/listings/96391dd8-2556-47cf-a3ff-de5634adf19d. Accessed 23 Dec. 2025.

Pink Lady Diner - Blueprints & Shaders Breakdown

Making Of / 11 May 2024

What is this?

Checkout the Artstation post here!

This is a comprehensive breakdown of all blueprints and shaders utilised in the Pink Lady Diner. My project has a lot of components and I figured it would be worth breaking down for anybody wanting to achieve similar outcomes or troubleshoot similar logic. Plus, I just love talking about the diner so its another excuse to give it the breakdown it deserves.

Blueprints – The Wurlitzer 1015 Jukebox

The Wurlitzer 1015 jukebox by design has 3 key components; playing songs from an array of tracks, mechanically animate the playing of songs and have synced emissive lights/tubes that rotate a LED strip. And so, the cumulation of this all minus the material shaders here is what you see above, a massive graph with concise sectors that I will further breakdown below.

Misc Functions for Jukebox

For handling the point lights around the Wurlitzer alongside randomising song selection these two graphs handle the logic. For matching the light colour I’ve grabbed all the light components and using a timeline with slate colours, update the light colours as per the time. I’ve timed these changes to match the emissive panning material. As for the random song selection, I’ve utilised a random integer in range to grab a randomised track from the song array list. A Boolean check ensures once this is done the song can be rerandomized on a replay. There are 12 unique tracks possible to be played all themed to the 80s!

Scene Audio Controller

One large issue I ran into when making the jukebox was the clash of ambient audio vs the music played. By adding attenuation, you can ensure that songs only sound loud when played around the jukebox however any ambient music will still overlap in this zone. So, to fix this I created a simple audio controller that exists in scene, allowing the jukebox to call to it to quieten the ambient diner track when a song is played. Should the song finish early or naturally the controller will be updated using the function; make quiet.

Beginning Interaction - Jukebox

As the jukebox graph is quite dense, I have broken it into multiple breakdowns here, the first being the interact play sector. The jukebox has to detect the player and allow them to both play and quit the song at any moment. For optimisation I have used a gate to control these parameters as the blueprint will only begin to listen for further instructions should the gate be opened (by the player being there). The casting is to ensure that the player can use the interact event much rather than the Wurlitzer waiting for itself to cause this event. Following a successful interaction (pressing E key + player being in the collision box) the jukebox performs a self-check on Boolean values. If events such as randomisation for song have not occurred this action is performed, if set true then the value is reset for the next button press. Ambient audio control is used here too to ensure background noise is quietened for optimal listening.

Playing the Record Part 1

The play sequence occurs should the playing song value be false. This Boolean is set to true once commencing alongside setting the first sound for the audio player. This sound is not the song but a whirling ambient clicking noise I recorded off my own record player as the Wurlitzer is purely mechanical. I wanted to add a bit of believability and ensure the player has amped up expectations building up to the song. Following nodes execute motion on the Wurlitzers interior components. These all animate in varying degrees of motion either Y or Z by linear interpolating timelines. As I wasn’t fully sure what value they would have to stop at, I made them parameters to fine tune in engine. This proved useful as clipping was one of my largest problems initially in execution. Additional checkpoints exist, these being Boolean values that record at what state the animation is, to help provide an equal quit point. Looking back, I would change this from Boolean variables to a float that could be added and then checked if it aligns as it would cut down on having so many variables.

Playing the Record Part 2

The second half of the play sequence reuses a lot of logic from the first. In future iterations I would recommend copying these values to a function and ensure you can input the mesh, stop and start values to reuse the logic much easier. Nearing the end the ambient clicking and record sfx is replaced with the proper chosen random song. Play is the commence, delaying the quitting/kill sequence until the length is done. I Encountered one major issue using the timeline setup when quitting as the record (which loops a full rotation) could not be stopped looping. Skip to my Bugfix subsection to find out more on how I fixed this issue.

Stopping the Record Part 1

Going back to the start branches, should the jukebox be interacted with again to quit the song the kill Boolean will spawn as true. The branches now check which checkpoints have been used to roll back the animation from, reversing all the timelines. Should the jukebox be stopped mid play, the song will additional be cut prior to all these rollback animations triggering. As previously mentioned in the future I would opt to use a float value to keep track of the state of the jukebox mechanical means however at the time knew no better. These graphs mirror that of the play mode just in reverse order.

Stopping the Record Part 2

The main brains behind the reset of the jukebox are the section commented ended naturally. This connects both the end of the play mode and the general checkpoint system after all roll back animations are executed. By first resetting the delay set by the length of the song, the song is then stopped and replaced. I have a secondary sfx for what the record player sounds like lifting the vinyl off and this is also killed here after execution nearing the start of the graphs.

Fixing Bugs!

One large problem I encountered I lovingly dubbed the floating vinyl bug is right as it says on the tin. Due to the timeline being set to loop, unlike the other timelines the animation never stopped updating. Even after not being called or executed to, after the vinyl was told to stop to start rollback animations it would continue floating + spinning. To fix this I cleaned up two sections, the first being the timeline. I added additional branches that use Booleans I already created for checking if a song is playing or if the kill sequence is activated to prevent setting the rotation if these are set on. This resolved the rotation issue however I soon realised a huge delay in cutting the song played, meaning the track would be back in the arm hold but cut there. This was due to a lot of unnecessary delays that I deleted and cleaned up the command. I also had a poor order of execution meaning it delayed prior to stopping the song causing the bug. Now all was right again.

Points of Reflection - Jukebox:

Overall, the jukebox is still the smartest blueprint I have cooked up however it does have its limitations and optimisation considerations. The first being a lot more functions to cut down on unique timelines + variables. The second being the sheer number of Boolean checks that are unnecessary for my checkpoint system should I have implanted a float counter instead. And the final consideration is cutting out the middleman of timelines altogether and using other means of linear interpolation over time. I feel that the performance impact it has with such a complex element that is only using a singular track could be vastly improved and I will be looking into more options in the future to implement such changes. However, looking ahead, I have never been more motivated for building on this logic to make more diverse systems. Speaking of more systems, this blueprint is only the cherry on top of the cake that is the rest of this post so strap in for everything else this interactive rock and roll diner has instore!

More Blueprints!

Clock

This clock blueprint is a much more simplified logic of the jukeboxes mechanical arm animations. However, in tune with how real-life clocks work I wanted to ensure that every single instance had a randomised position of the second hand, meaning they were all out of sync. A little detail that was executed with a function to set the random position at the start of the game and continue animating throughout the diner playtime.

Splines

Splines are elements I heavily utilised in the diner as there were so many elements that horizontally tiled. These being bunting, neon strips, exterior pavement, powerlines, and cables. For the bulk of the blueprint, I utilised this main base of logic to provide randomisation of the meshes in an array (e.g. bunting) or singular placement across a strip (e.g. neon). All logic occurs in construction as there is no need for these values to change in real time. Following on the loop is executed for all sectors of the spline, meaning that the correct chosen mesh is added. To help with deformation round corners I utilised tangents and location distance to breakup any overlap on the spline. Generally, a long graph that I strongly believe I can optimise further by copying subsections regarding tangent and location distance calls to the same variables, cutting down the get node.

Physics Part 1

Big thanks to Max Ryan for help setting this up! One of the most fun elements of the diner thus far is the physics elements that allow you to throw chairs, plates, cups like a thrashing greaser teen in the 80s. For implementing this logic, I built on top of the standard first-person controller script as I needed to utilise the cameras instructions surrounding line tracing. Objects are line traced and checked for if they can be picked up, alongside if the Boolean for an object has been triggered for having collected an object already. If no objects are picked up, and the object has a suitable physics asset to interact with it is then grabbed for location data. Following this every frame the location is updated with the first-person controllers one to maintain a grip on it. Should the pickup button be triggered again the release branch will play instead allowing releasing the physics component. Whilst a bit expensive it proves a very fun system to play around with, ensuring interactable meshes are both set to moveable and have physics enabled.

Physics Part 2

But that’s not all there’s more commands I added to the first-person controller to help make the scene easier to navigate and focus on objects. Zooming and crouching were easy to build in by setting an interaction key and lerping the placement or field of view for the camera. If you have an object picked up, I also implemented a scroll wheel sandbox like function to help, bring it closer or further away to yourself through two functions adjusting its position. Looking back on this graph there are limitations when interacting with larger objects as they may go out of frame due to their scale on the scroll function so I would recommend grabbing the bounding box of the mesh and using that scale to figure out how close it comes up to the camera rather than hardcore values.
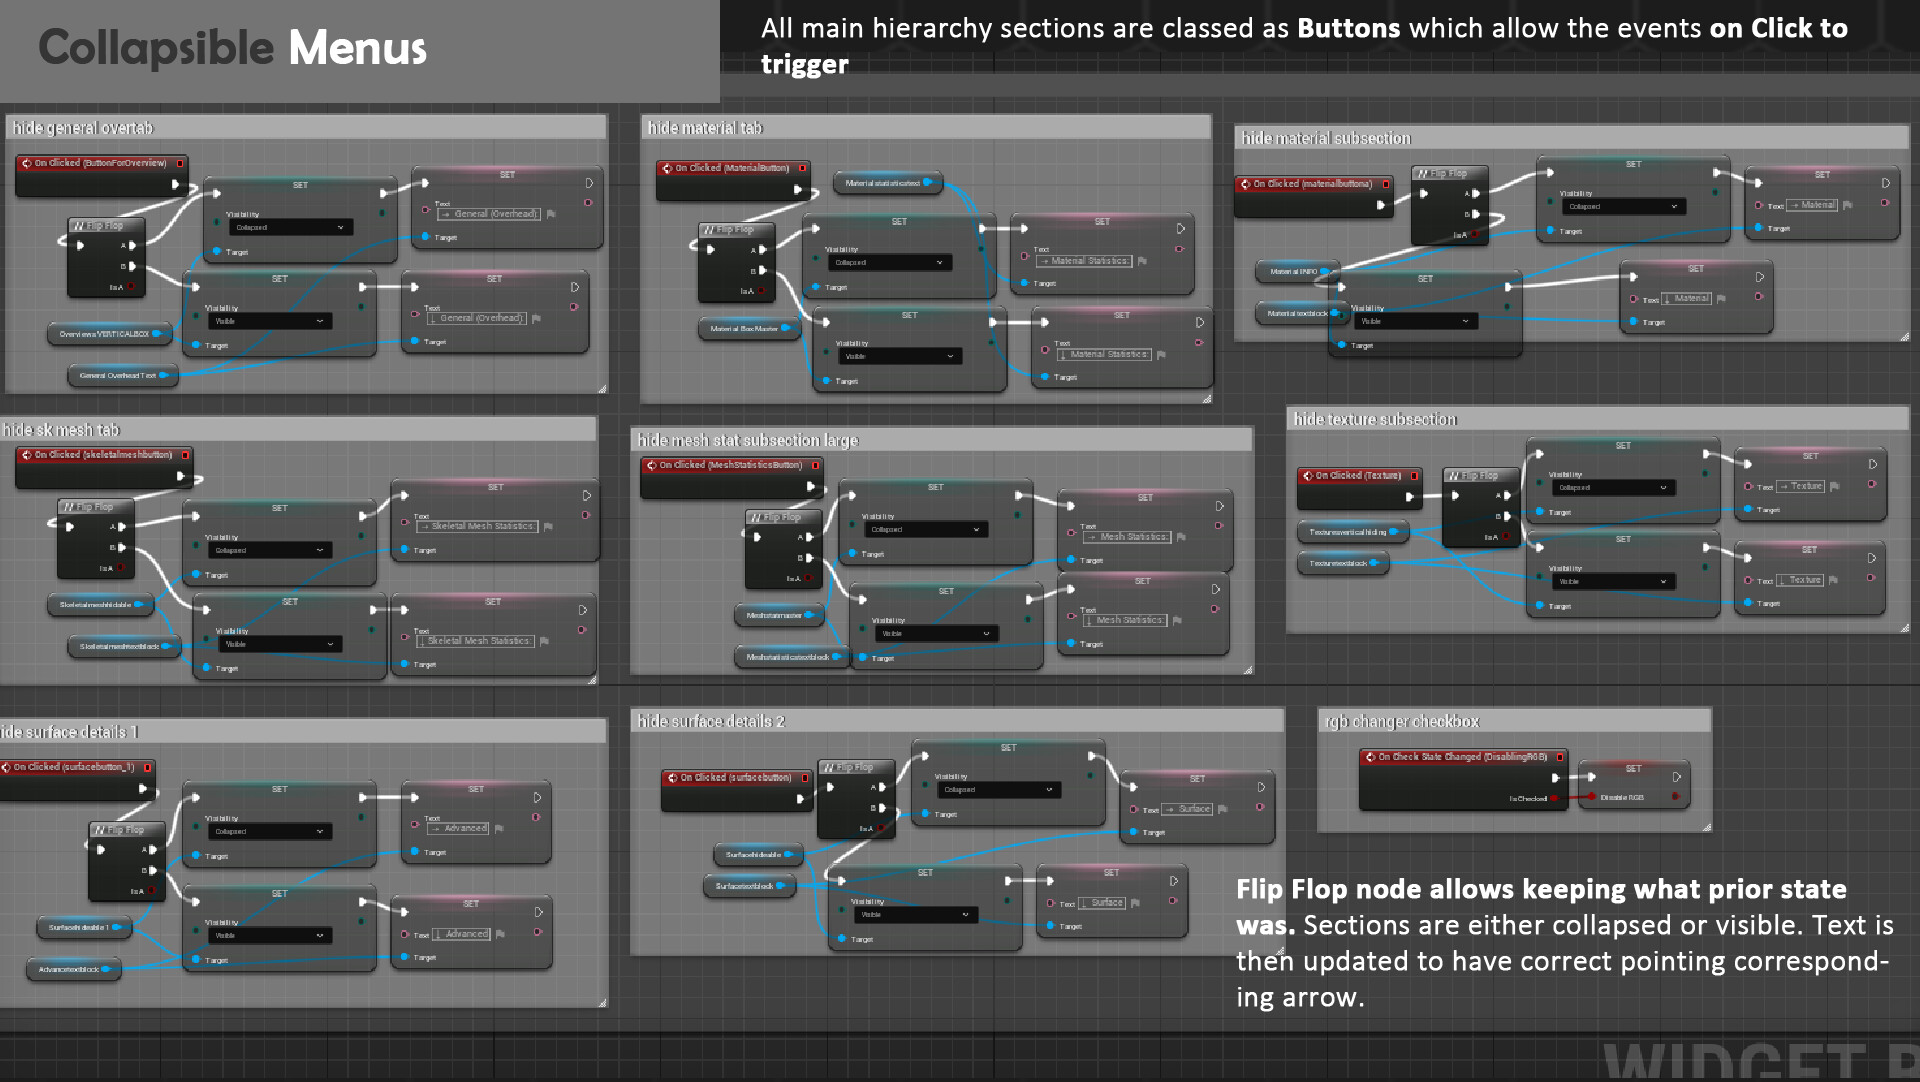
Doors and Cupboards

What’s a diner without doors and cupboards stocked full of goodies right from the 80s. I knew I wanted to show off all the hardcore research I did to getting era accurate packaging, so cupboard/floor doors have the ability to be opened. General detection and door movable graph included pressing the interact key and animation its pivot point based on a flip flop node. Flip flop nodes are brilliant as it will remember what position it was in prior meaning you don’t need a Boolean for this. However, for cupboards I did want to limit some to be locked, especially corner clippable ones so I added a bit more logic. If the exposed Boolean for can be opened is set to false text will not only be added to tell the player the box is shut, however a short wiggle will occur on the pivot of the door. Most important elements for this blueprint are ensuring the pivot of the mesh itself is aligned to where hinges are modelled, or else animation will rotate on the centre providing an unnatural swing.

Material Shaders – 

My diner also had a lot of complex materials to help bring it to life and make the most out of my modular meshes + textures. Here’s all their shader logic broken down too.

Shaders – Glass:

Big thanks to Nina Klos for helping with this one! This glass shader works by utilising a Fresnel to help create a sharp glint at corners + edges. Alongside this the refraction index is set the normalised glass value meaning the behaviour of distortion will be alike with real glass. The cherry on top is the tint that is applied with a thin translucent material and plugs into the colour allowing a breakup in the materials general colour if plugged in. I also have an additional roughness control for tiling wear maps that I ended up not using but kept just in case.

Shaders – Wurlitzer 1015:

My jukebox isn’t just all blueprints this brilliant piece of ancient tech is also packed with 2 unique shaders to help animate those tubes. I watched countless videos on how it works internally to figure it out and the real thing proves to be extremely clever. For the large tubes that swap colours in real time the tubes rotate inside a thin piece of colour film that then is blasted with light, allowing that distinct cut fade. I replicated this behaviour by panning an additional emissive map downwards and by ensuring the unwrap for the tubes were horizontal. Duplicating the uvs allowed me to sync up the timing for these fades starting from the centre and fading out. The secondary material being the bubbler tubes that rely mainly on panning normal. I made an extra normal map that is blended together after being panned vertically to help flow up and down the tube. Whilst a small micro detail I wanted to add it as it adds another fun detail to spot during playtime. For real life the jukebox would heat up the bubble tubes causing them to flow up and internally pop due to the unique boiling point of the liquid. My normal pan the same direction however do not thermally combust.

Shaders – Master Material

To help with texture adjustments in engine I always employ creating a master material at the beginning of a project. The following is rather simple but provides ample adjustable parameters for the channel packed maps and the ability to cut out masking. My primary problem I encountered with this approach was that shader costs exponentially increased when enabling varying render methods e.g. translucency, two sided etc. To prevent a chair having to render this setting, once I made a good base master material, I duplicated the material to create variants with these settings applied. This made the instances on top of them more optimised in the long run.

Shaders – World Dirt using World Position

Being a diner, I knew grit and grime would scale up on just about anything that touches the ground. So, I added a world position mask that uses the blue channel (Z) to fade a noise of dirt onto meshes. The texture of this noise can be adjusted alongside intensity + colour in game. Due to using a world position node I knew I didn’t want to add this to my main master material as it would explode cost over every single asset hence it being a separate material to begin with.

Shaders – Flag and Wind WPO Movement

Having used cloth a lot in the past I knew that the smoothness of folds simulating was widely limited on the vertex count of the mesh. Which makes sense, it does have to move however not very game friendly to have an expensive flag plane, so I opted to use a material to animate micro movements. I used pre-existing panning noise from the simple grass wind and clamped these values alongside a gradient that scaled across the planes top and bottom sides. This helped focus the noise in a more uniform box that acts quite well to make the mesh look denser than it really is in the final simulated wind.

Shaders – Decal UV Atlas

Due to the sheer volume of decals I needed to make for table numbers I opted to have them all packed tight onto one sheet and simply scroll the UVS per instance to ensure the correct one is selected. This simple material provides that alongside having packed a roughness map into the normal to save on additional draw calls. In future shaders I would automate this to a value generated based on object position or that can be incrementally scaled via float parameter. As instances of the decal atlas require manual scroll adjustments which is finer control at the cost of a more time-consuming setup. Fortunately, due to how the UVS are packed the value to scroll between numbers is hardest per row and predictable, more reasons to be able to setup a more automated approach that I will explore in future shaders.

Shaders – Ceramic Emissive Lights

The lights I wanted to create proved to be a challenge due to the material it was made from, ceramic thickened glass. In real life the ceramic means the bulb inside creates a nice, softened glow alongside the thinnest points e.g. the edges and inside. I decide to use subsurface scattering which is commonly used in skin and foliage to achieve this affect alongside a channel packed thickness map to ensure more controller on the edges of the emissive. The result whilst easily overclocked at a good midtone value creates a smooth orangey glow.

Shaders – Exterior Foliage

All foliage in the scene is outside meaning I can drop costs for texture quality down. However, being grass in the deserted state of Nevada I decided to still implement typical grass wind movement that is clamped via a world position node to the ground. Additionally, I created a subsurface for the node by reusing the base colour map, hue shifting and lightning the result with multiply to help cut down on texture costs.

Controlling Time of Day

With an abundance of great neon and fun lights to play around I duplicated my final daytime scene twice more and lit it in a more morning + nighttime variant. To showcase these during playtime I created a simple graph that exists within the first-person controller that loads levels based on pressing a number between 1-3. As for optimisation level setup and reset once its built, I also included additional quit and reset keys using the same logic. These proved extremely useful during degree show as individuals playing the level could refresh the game and play from the start without shutting down the game.

Summary:

In conclusion I hope this documentation provides useful insights to building your own shaders and blueprints. There is no right or wrong way to build these elements however optimisation is key so elements to consider should you replicate this logic is: how many Booleans do you really need, channel pack as much as possible for textures and keep meshes static unless animated. 

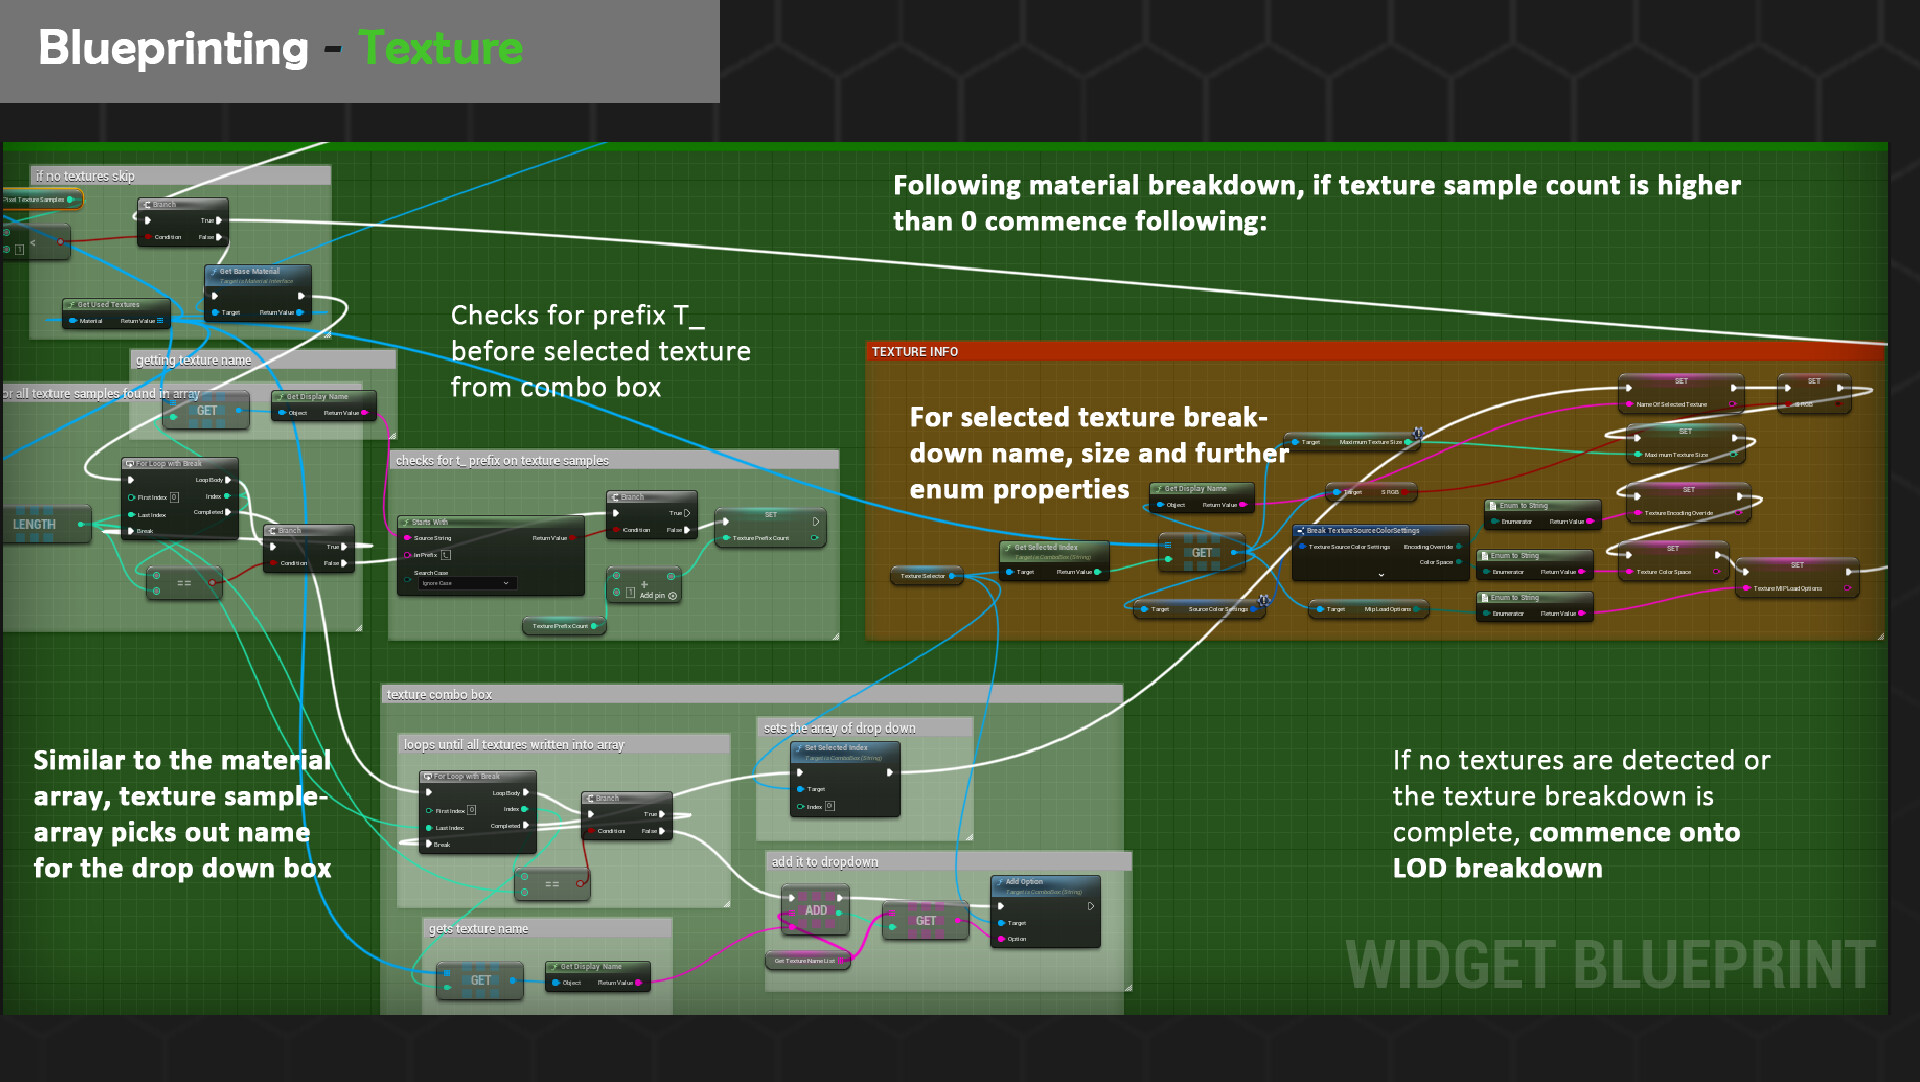
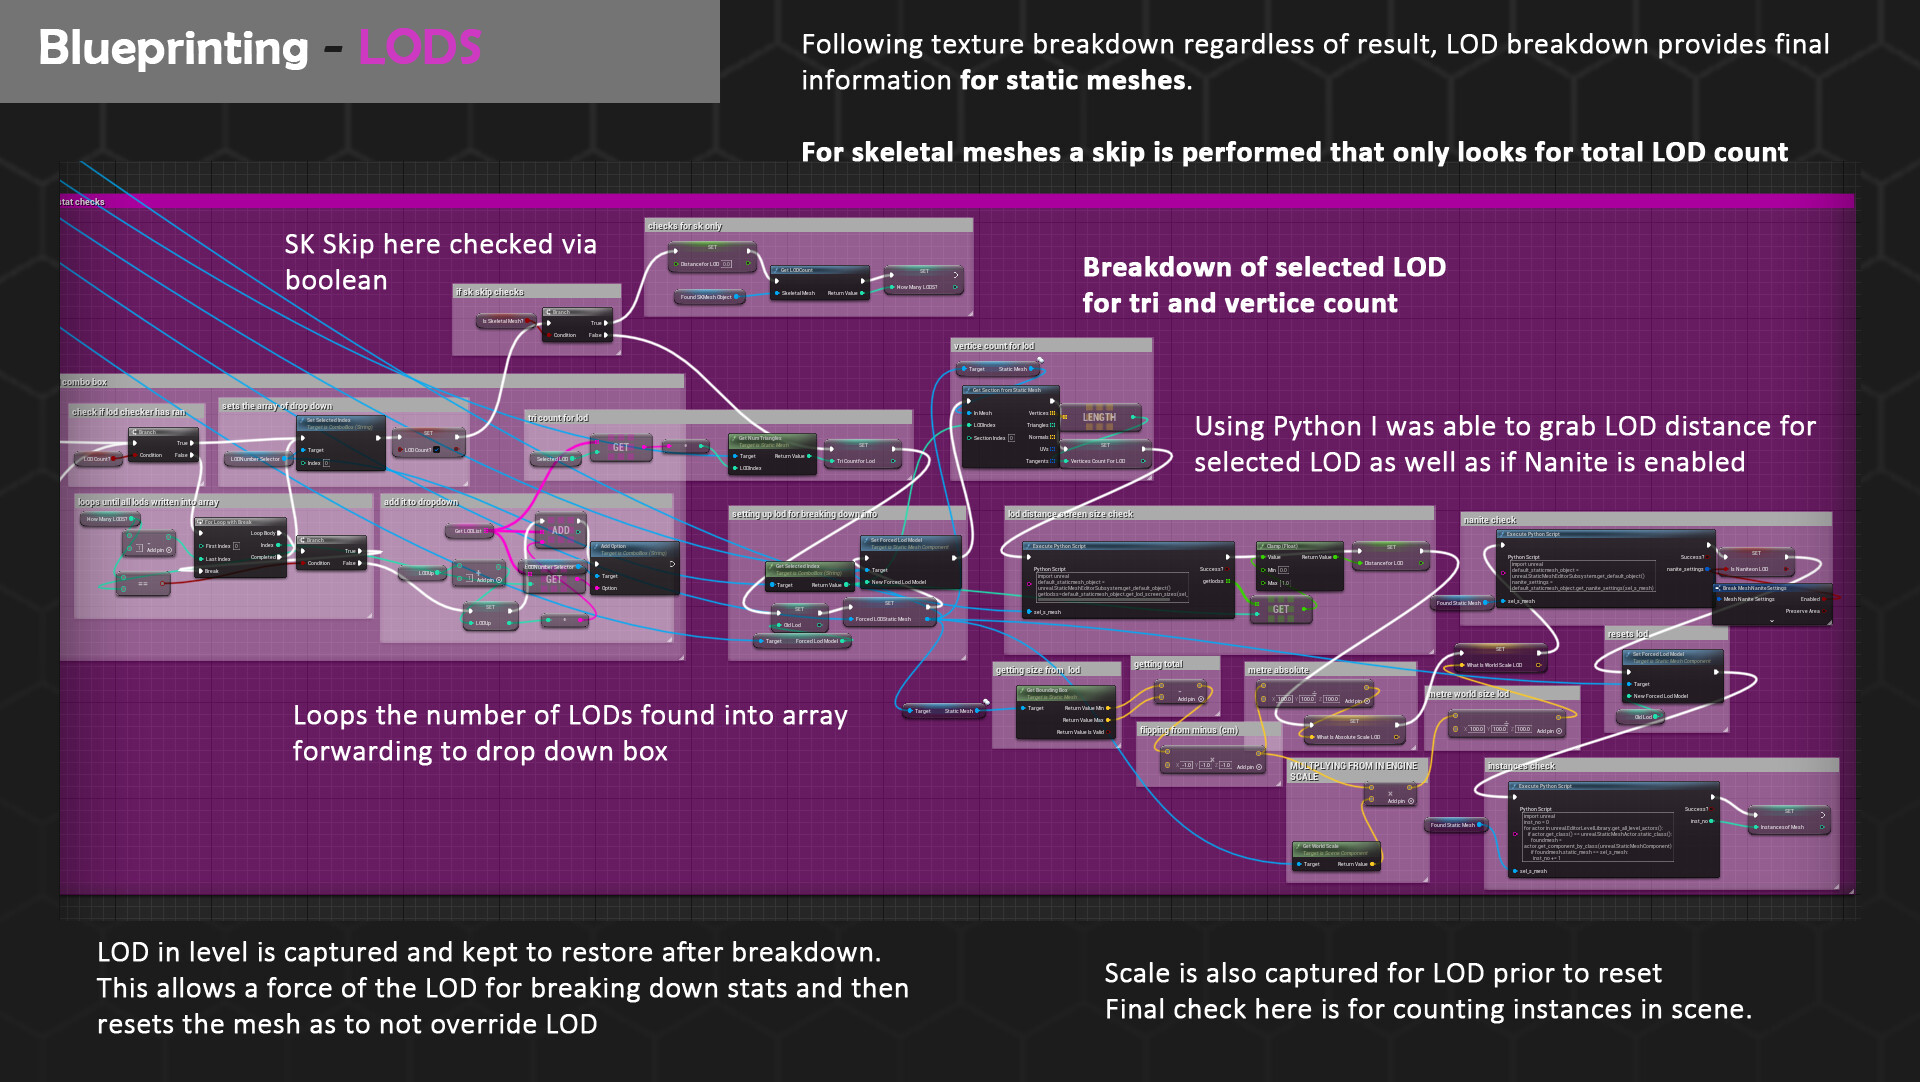
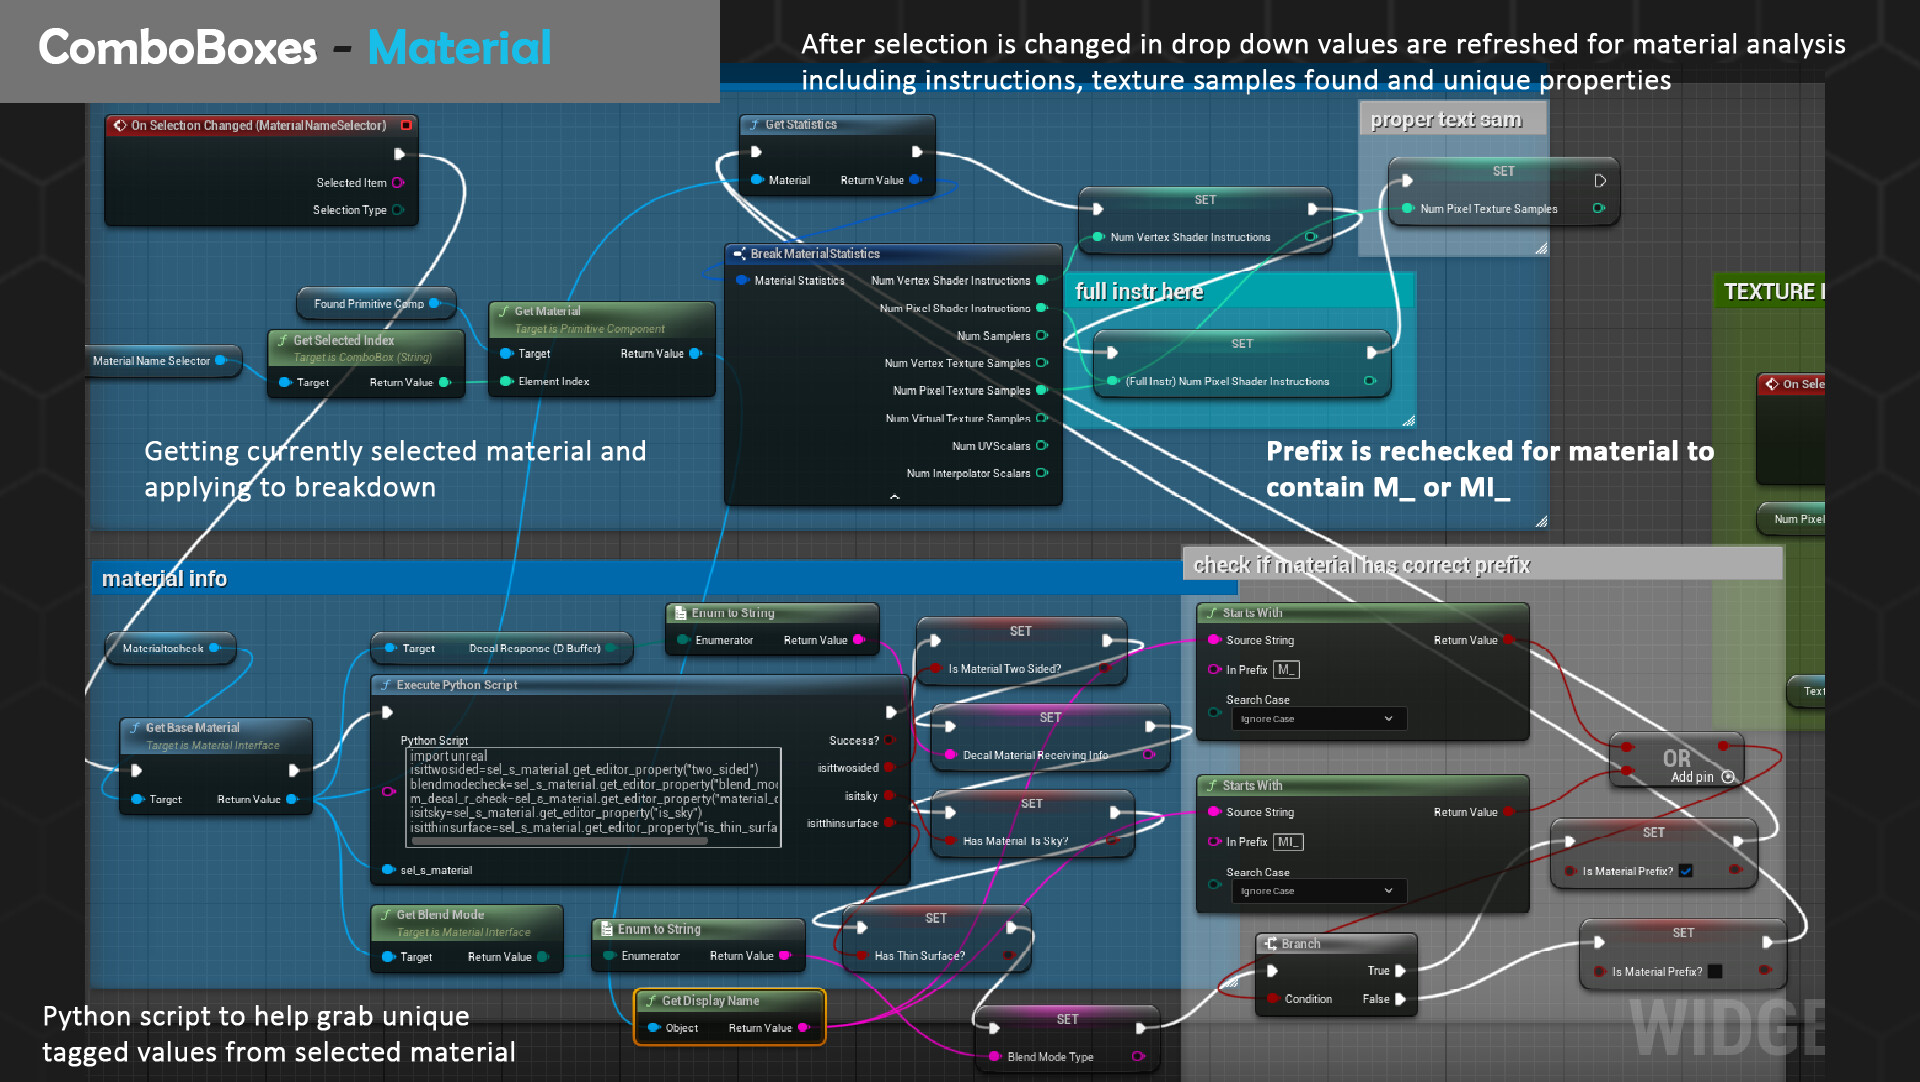
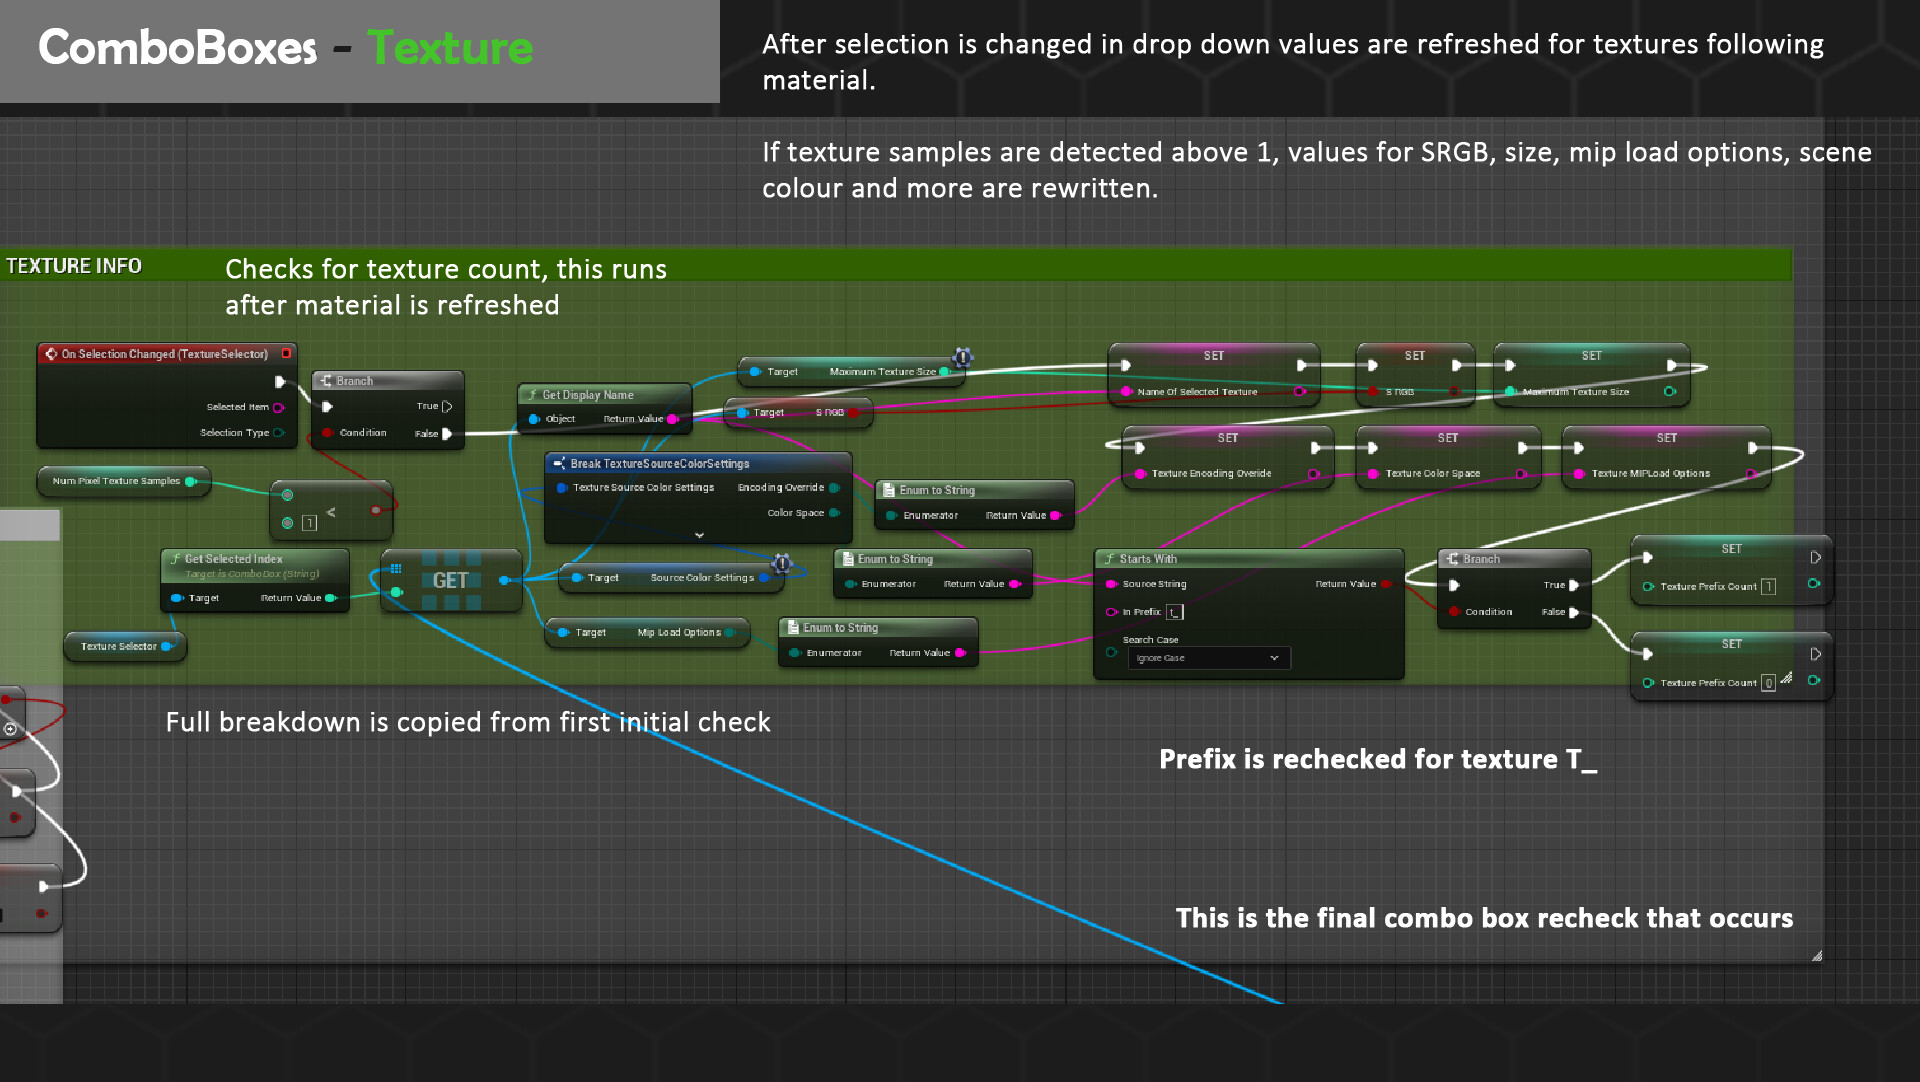
If you like what your read be sure to checkout B3NNY! My self-contained data asset fetching script that helps provide a useful visual breakdown of both static and skeletal meshes! https://www.artstation.com/artwork/yDwYzO


Making A Data Fetching Utility Editor Widget - UE5 + Python

Making Of / 06 May 2024

B3nny - Fetch Utility Editor Widget

A data fetcher script for quick read only breakdowns of selected assets in the level. To be used with conjunction with audit tools to help troubleshoot issues or look at data in a drop down collected format.

What can it do?

  • General - naming conventions for static meshes, skeletal meshes, materials and textures. Collision detection, nanite enabled checker, texel density readout and instance in scene counter.
  • Mesh Stats - tri count, vertices count, size measuring for original and in level mesh. Comparison of scale, advanced breakdown of same mesh info for lods. Total Lod counter, nanite checker and screen size display for each lod.
  • Material statistics - number of materials, counter of empty material slots, instruction breakdown cost for pixel and vertex (with cost colour grade). Additional material info: blend mode, decal material info, two side check, thin surface check, is sky check and total texture sample count.
  • Texture - total textures found in material, texture inspection for SRGB, colour space and encoding options.
  • Skeletal Mesh Only - bone counter and physics asset locater.
  • Sleek Design - Collapsable menus, informative tooltips and scroll bar. Sections are sensitive to selected mesh type and will hide if no data is available e.g. skeletal mesh tab for static mesh.
  • Entirely self-contained – only 1 asset to migrate between projects with prerequisite of python plugin. Read only ensures no data is tampered with and higher performance.

Making the Widget

Script Concept – Goals and Inspirations

I originally designed Benny for the need to fetch texel density data. I soon realised that there was a lot more useful data that could be fetched too for displaying for artists and optimisation alike. So, I laid out more ground rules to ensure the project doesn’t spiral out of scope. These being:

  • Widget is Read Only – as this widget would like at a variety of data from naming conventions to shader values, I did not want to risk it overwriting values/breaking up references. So, for now Benny is read only.
  • Self-Containment – I didn’t want to have to make migration a hassle between projects by adding fonts, varying sprites and more assets that the widget would call on to run.
  • Make it fetch texel density and prefixes correctly! – above all else these are the most important pieces of data I and many artists like to check when building 3D scenes as such I need to ensure that its accurate + fast.

Nearer the end of the project, I go over how well I went to achieve these outcomes including enlisting the Python plugin to help grab additional data.

Breakdown UI – Referencing Blender

Whilst I drafted up a list of variables earlier, I realised I needed an easier + intuitive manner to display the data. Since there was a lot of data at hand clarity was important and so I went comparing UI in varying 3D programs. My favourite ended up being Blender as the design was carefully crafted to be an ease on the eyes colour wise and employed a lot of nesting tree views to keep elements accessible. I loved the idea of collapsing parts you wouldn’t want to look at, so I went to draft this out in UE. I came across an option in the editor utility widget designer called Tree_View that I ended up not using due to the manner it used additional widgets to setup a working script. I hated the concept of spreading my blueprint around more files and knew this would violate one of my main design goals, so I ended up creating my own collapsing system that uses buttons for headers and sections.

Further Development of Nesting

On click the nodes flip flop between being hidden or visible which keeps their orientation despite computing. For debugging means I also had my blueprint computing node button and python separate at early stages to help troubleshoot issues easier. You may notice a splash of colour too on my headers, this soon was removed as it became super bright and difficult to read in contrast the grey. For sub menus my friend Ajay Hiser helped to group to data via closer knit sections that made more sense than my initial rough overdraw view.

Final UI & Widget View

Here is the current finalised widget view. With a sleek grey layout and lighter headers all data is readable. You can even disable the RGB flashing title if it proves too distracting, but I have left it in for a fun little element of design. There are 8 collapsable menus to help keep data clean and if a user computed a static mesh element or skeletal mesh + vice versa and hidden. All data calculation occurs on the compute button, so the strain isn’t too performance intensive during runtime as nothing is constantly checked. A lot of additional branches have also been provided to skip data fetching as necessary if elements such as materials/textures are empty as you will see next up.

Full Look at the Event Graph:

Here’s the entire event graph in its glory. I will begin to break down all the logic below section by section so buckle up!

Blueprinting – Start of Compute

My graphs first go run a clearing mode where data is wiped from combo boxes, Booleans are reset, and arrays are cleaned too. This is due to some bugs during testing where if a manual wipe isn’t done at the beginning data would be added onto resulting in materials appearing across meshes that don’t have them if I compute two different targets. First, it’s important to determine that only one object is selected. I used a get selection node that counts the length to check that the number is no bigger than 1. Feeding a Boolean that is triggered preventing execution should this occur to be true. Following this the main selection checker occurs. By getting the selected objects class you can determine whether the execution will continue on the static mesh, skeletal mesh or bad mesh pipeline.

Blueprinting – Static Mesh

If the class is determined to be true for static mesh, we then look for prefix data. By checking the start of the display name, we can determine if there is a sm_ present. If not, a Boolean flag is triggered that then allows text to be flagged on the UI that no prefixes were found. Following on more important data is collected regarding the tri count, vertices and lod by using a get section mode. You may also notice a couple of set nodes; these allow me to reuse the call for this mesh in varying points of the graph for nicer housekeeping/cleanliness of lines. However, it also allows further on categories that only use primitive components such as get material and texture to not have to be doubled to account for skeletal mesh or static mesh variants. Moving on texel density is calculate through the world scale of the object being compared against the chosen density from the texel dropdown. I use the equation: (world scale surface area ÷100) ÷texel density=density ratio per metre. I then compare this value 821 for how high or low the ratio is. If the ratio is lower than means the map selected is too high, if the ratio is higher that means the map selected is too small. Between that value is good texel density for 1024 per metre which is standard. I tested this formula and tweaked results using the Unreal Engine cube and varying meshes. I may add a toggleable changer if you want lower or higher density however due to performance and visuals 1024 is industry standard for most games. 

If you want to read more about texel density I highly recommend checking out Beyond Extents breakdown and math as the post heavily influenced how I constructed my blueprint: https://www.beyondextent.com/deep-dives/deepdive-texeldensity

Blueprinting – Materials

Following grabbing info for static meshes and beginning a custom event that grabs lods regardless of mesh type, we move onto materials. Materials are first counted prior to calculation and added to the combo box (drop down) array. I used this method quite a lot due to its reliable results to put names of each material, texture or lod in correct order. This data is then referenced further when selection is changed but in the primary first portion if 1 or more materials are detected then breakdown commences. The first being prefix check for either M_ or MI_ naming conventions. I also used the string length calculation to look for empty materials and tally up a score if there are unused slots on a mesh such as empty ids.

By getting the current selected index (the current selected material from drop-down) I can get the material instructions, shader cost and more data through a python script. There are two key differences between the preliminary shader cost calls as I realised pixel seems to refer to current rendered instructions whilst vertex compiles everything. This became more apparent when testing in my Pink Lady Diner scene as master materials have toggleable static switch parameters. Meaning not all instructions are used since some map adjustments, WPO or more is toggled off however still shows up in the vertex instructions cost count. As not all properties are available, I ended up consulting to a simple Python script that allows plugging in the selected material interface that is then combed through for editor Boolean tags of issky, is twosided and much more. These values help explain why some materials are more beefier instructions wise. Furthermore, you can also extract texture sample calls from this point which becomes very important up next to ensure only running the next portion if this is true to there being textures at all.

Blueprinting-Skeletal Mesh

This is the alternate path to the static mesh route that eventually joins up on the material subsection by utilising a custom event, Follow Up. However, prior to all this some checks are performed to ensure that the mesh had a skeletal mesh component and is not an unsupported mesh aka bad mesh. A prefix check is then run on the display name for SK_ or SKM_ as I have also seen it used. Due to some limiting factors of data, I could get from a Skeletal Mesh no tri or vertices count could occur, but I did replace this by getting other useful data. Such as the total number of bones and if there is a present Physics Asset. A custom function is_SK also runs to hide all the mesh boxes that are not written to and reveal the skeletal mesh sections.

Blueprinting-Texture

Following on from the materials checker, if texture samples are detected then the array writing algorithm is employed to put the results into the correct texture drop down box (combo box). The index is then set at 0 and this texture is sent forward to be analysed further for SRGB properties, mip mapping and more. Prefix detection occurs here too. Unfortunately, I could not get extra readouts of scale and size on disk to work correctly which is why these variables have been scrapped. I encountered a plethora of bugs that caused crashes due to this request alone which I suspect might be with how elements are loaded into memory. Fortunately, this data can be accessed with the Tools>Audit options so if needed to lookup you can still find more readouts here.

Blueprinting-LODS

The final large lookup of the breakdown occurs here for LOD breakdown. This section works a bit differently in that it both supports and skips Skeletal Meshes. Due to the nature of a lot of meshes not even having LODS this combo box may only write 1 entry for the most part. The most interesting variable I was able to grab is the screen distance value of which the LOD pops in on. This can be viewed to be grabbed on the Python script by plugging in the selected LOD. Another unique feature of this section is that for the viewability of these additional LOD details I had to use force LOD to load these meshes in. However, an empty variable allows to keep the data of the original LOD on the mesh from scene so that it reverts back once the data is fetched + looked up. Utilising prior logic, tri and vertices count is fetched here too by breaking down the sections of the LOD. Should a skeletal mesh be found instead a branch takes a very different direction.  The total number is still grabbed for LODS however distance is set to 0 as there’s no way to find this otherwise due to it being an unsupported mesh type from the Python side of things.

Drop Downs – Recycling Logic for Refreshing Selected Values

As you may already see if we only use the compute options, we run into an annoying predicament of having to compute for every change to a drop-down box. For most instances due to the clearing nature, it will not even remember what option was selected. Fortunately, the combo boxes (drop downs) have options to select events to run after a selection is changed. By re-grabbing existing nodes that look up parameters e.g. section breakdowns we can grab the selected index of the combo box to fetch appropriate data. 

As all our info is already gathered in arrays fetching it for these breakdowns is relatively easy with the exclusion of some big crashing bugs that I had to amend first. As not all checks can occur if elements are missing say no textures, however the user still selects an index drop down value of 1 somehow or from a prior selection, the project crashes. I had to manually implement failsafe branches to double check if there are textures, materials or lods to even sift through so in worse case the event graph picks up a selection change it wont run. This fixed the majority of my crashes.

Collapsable Menus

Initially I looked into tree view as an alternative to make collapsable menus however as previously noted it was not suitable with my widgets design goals. I also found this method to be more performative and easier to adjust by having two flip flopped states for hiding/showcasing elements. The logic was easily replicable across all events of on button click for the sections with the amendment of changing the text that would update the arrow direction.

House Keeping Nodes

Due to the flow of logic some combo boxes had to be forcibly cleared as such the material box. However, I ended up encountering bugs that made the widget confused as to what the default index should be for elements such as texel density which would thereafter break logic using it to calculate math. So, I had to add some extra nodes to set these prior to construction, being careful not to overload this section as it would mean a longer run setup. I also had a little bit of fun by adding the header name Benny to change colour using some random hue logic. To maintain accessibility, I implemented a checkbox that would toggle this to a forceful white however you too can experience a bit of rainbow Benny on startup.

Bugs Encountered & Fixed

Due to this being my first time working with both Editor Utility Widgets and the Python Unreal Engine API there was a lot of crashes. For the majority of these bugs, I had a crash log readout to consultant that would tell me a variable would be looked prior to existing for example the textures being read on a material that doesn’t actually have a texture. By then having logic that acts on the assumption of there being a texture sample it crashed immediately. Other notable mentions are the Python APIs specific calls for Static Mesh actors. I had incidentally plugged in a Static Mesh Component, which appeared the same blue as the actor that had me very puzzled as to why I was not getting a readout of my Nanite and Instance checkers. I at one point was convinced my entire script was wrong however when I tried to run exemplar scripts it too refused to print out what I wanted. Secondary honourable mention that was lightly comedic was that Python has two grab commands for level assets and content browser assets. Prior to plugging values in I figured I must have to get them anew and was puzzled why the widget kept being picked name wise and exploding in errors. Turns out it was picking Benny as it was the selected widget in content browser, and I needed to alternate to the level editor actors instead of getting all actors.  Here’s also a scrapped sprite I made in Asperite for Benny that ended up getting cut as once again it meant a harder migration between projects.

Python API Link - https://docs.unrealengine.com/5.2/en-US/PythonAPI/

Final Showcase:

Check out the full Artstation post to see Benny in action:

https://www.artstation.com/artwork/yDwYzO