B3nny - Fetch Utility Editor Widget

A data fetcher script for quick read only breakdowns of selected assets in the level. To be used with conjunction with audit tools to help troubleshoot issues or look at data in a drop down collected format.
What can it do?
- General - naming conventions for static meshes, skeletal meshes, materials and textures. Collision detection, nanite enabled checker, texel density readout and instance in scene counter.
- Mesh Stats - tri count, vertices count, size measuring for original and in level mesh. Comparison of scale, advanced breakdown of same mesh info for lods. Total Lod counter, nanite checker and screen size display for each lod.
- Material statistics - number of materials, counter of empty material slots, instruction breakdown cost for pixel and vertex (with cost colour grade). Additional material info: blend mode, decal material info, two side check, thin surface check, is sky check and total texture sample count.
- Texture - total textures found in material, texture inspection for SRGB, colour space and encoding options.
- Skeletal Mesh Only - bone counter and physics asset locater.
- Sleek Design - Collapsable menus, informative tooltips and scroll bar. Sections are sensitive to selected mesh type and will hide if no data is available e.g. skeletal mesh tab for static mesh.
- Entirely self-contained – only 1 asset to migrate between projects with prerequisite of python plugin. Read only ensures no data is tampered with and higher performance.
Making the Widget
Script Concept – Goals and Inspirations

I originally designed Benny for the need to fetch texel density data. I soon realised that there was a lot more useful data that could be fetched too for displaying for artists and optimisation alike. So, I laid out more ground rules to ensure the project doesn’t spiral out of scope. These being:
- Widget is Read Only – as this widget would like at a variety of data from naming conventions to shader values, I did not want to risk it overwriting values/breaking up references. So, for now Benny is read only.
- Self-Containment – I didn’t want to have to make migration a hassle between projects by adding fonts, varying sprites and more assets that the widget would call on to run.
- Make it fetch texel density and prefixes correctly! – above all else these are the most important pieces of data I and many artists like to check when building 3D scenes as such I need to ensure that its accurate + fast.
Nearer the end of the project, I go over how well I went to achieve these outcomes including enlisting the Python plugin to help grab additional data.
Breakdown UI – Referencing Blender
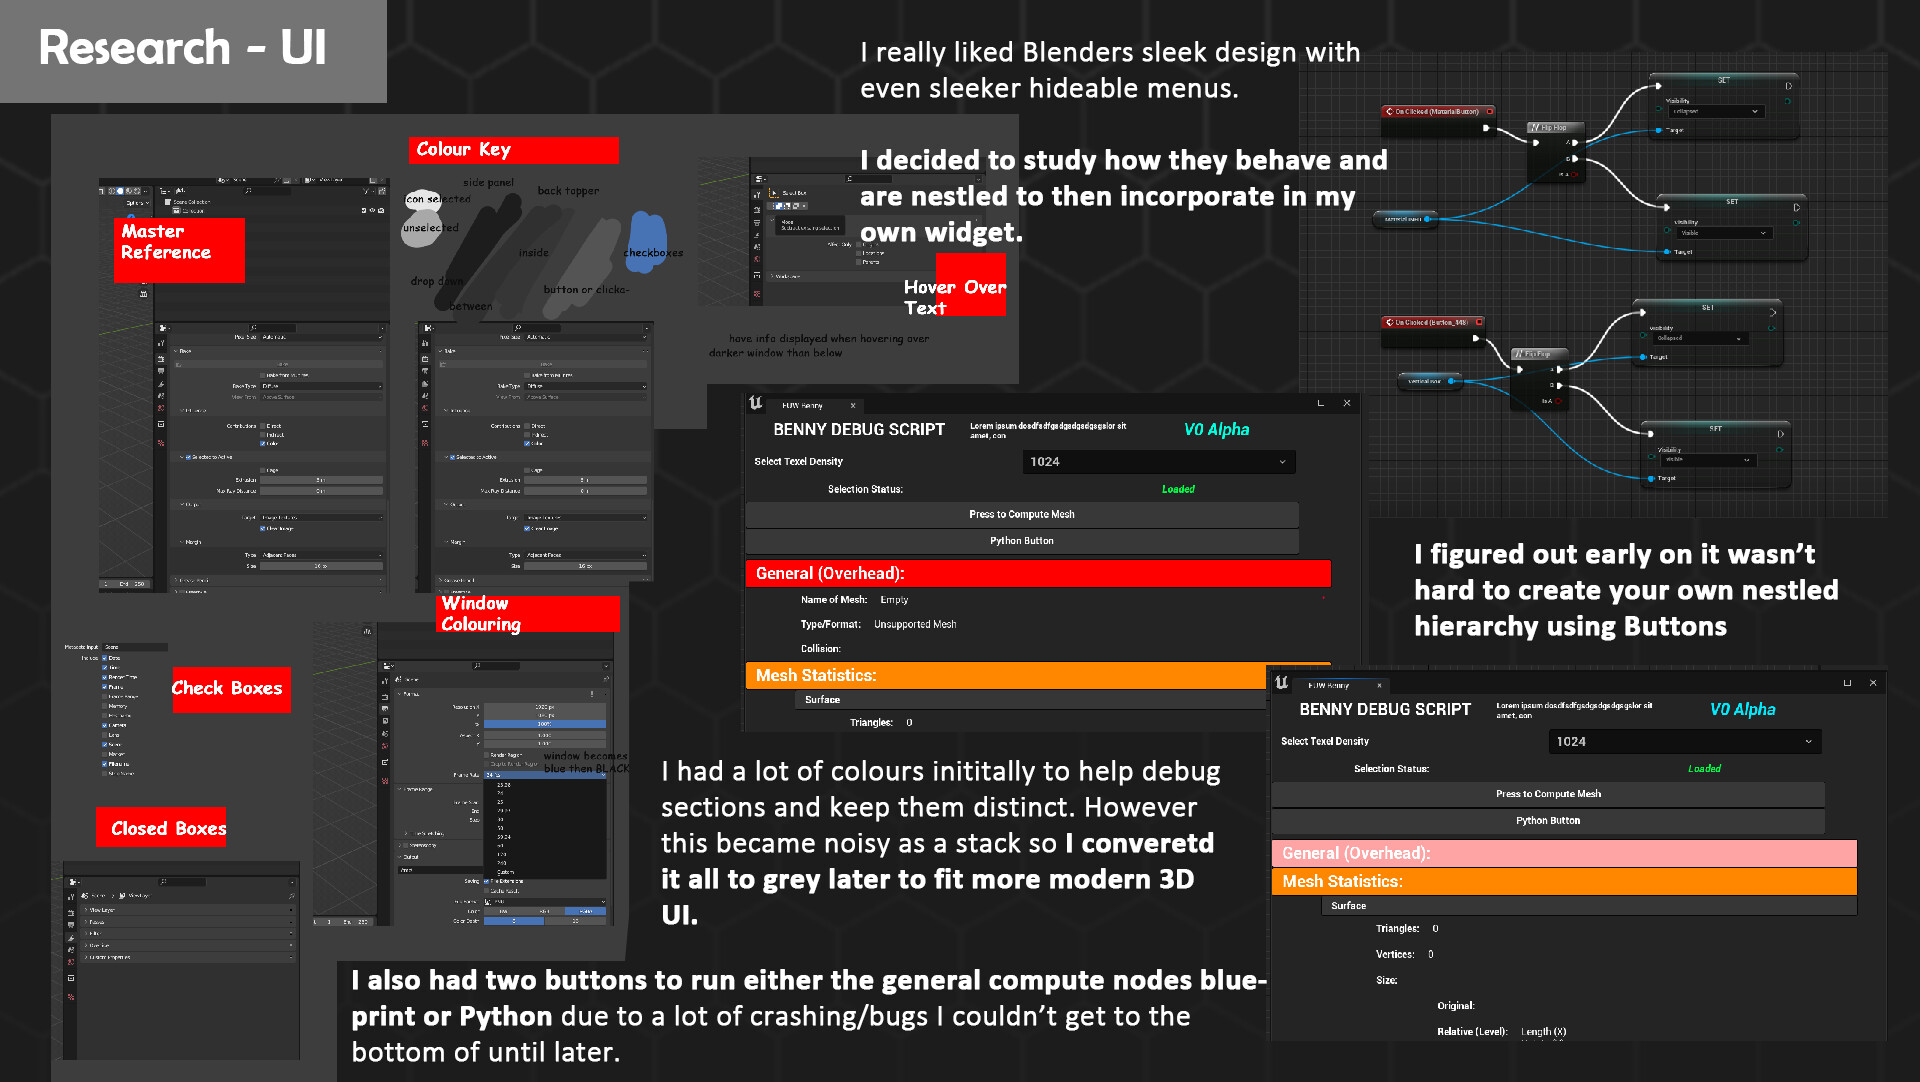 Whilst I drafted up a list of variables earlier, I realised I needed an easier + intuitive manner to display the data. Since there was a lot of data at hand clarity was important and so I went comparing UI in varying 3D programs. My favourite ended up being Blender as the design was carefully crafted to be an ease on the eyes colour wise and employed a lot of nesting tree views to keep elements accessible. I loved the idea of collapsing parts you wouldn’t want to look at, so I went to draft this out in UE. I came across an option in the editor utility widget designer called Tree_View that I ended up not using due to the manner it used additional widgets to setup a working script. I hated the concept of spreading my blueprint around more files and knew this would violate one of my main design goals, so I ended up creating my own collapsing system that uses buttons for headers and sections.
Further Development of Nesting

On click the nodes flip flop between being hidden or visible which keeps their orientation despite computing. For debugging means I also had my blueprint computing node button and python separate at early stages to help troubleshoot issues easier. You may notice a splash of colour too on my headers, this soon was removed as it became super bright and difficult to read in contrast the grey. For sub menus my friend Ajay Hiser helped to group to data via closer knit sections that made more sense than my initial rough overdraw view.
Final UI & Widget View
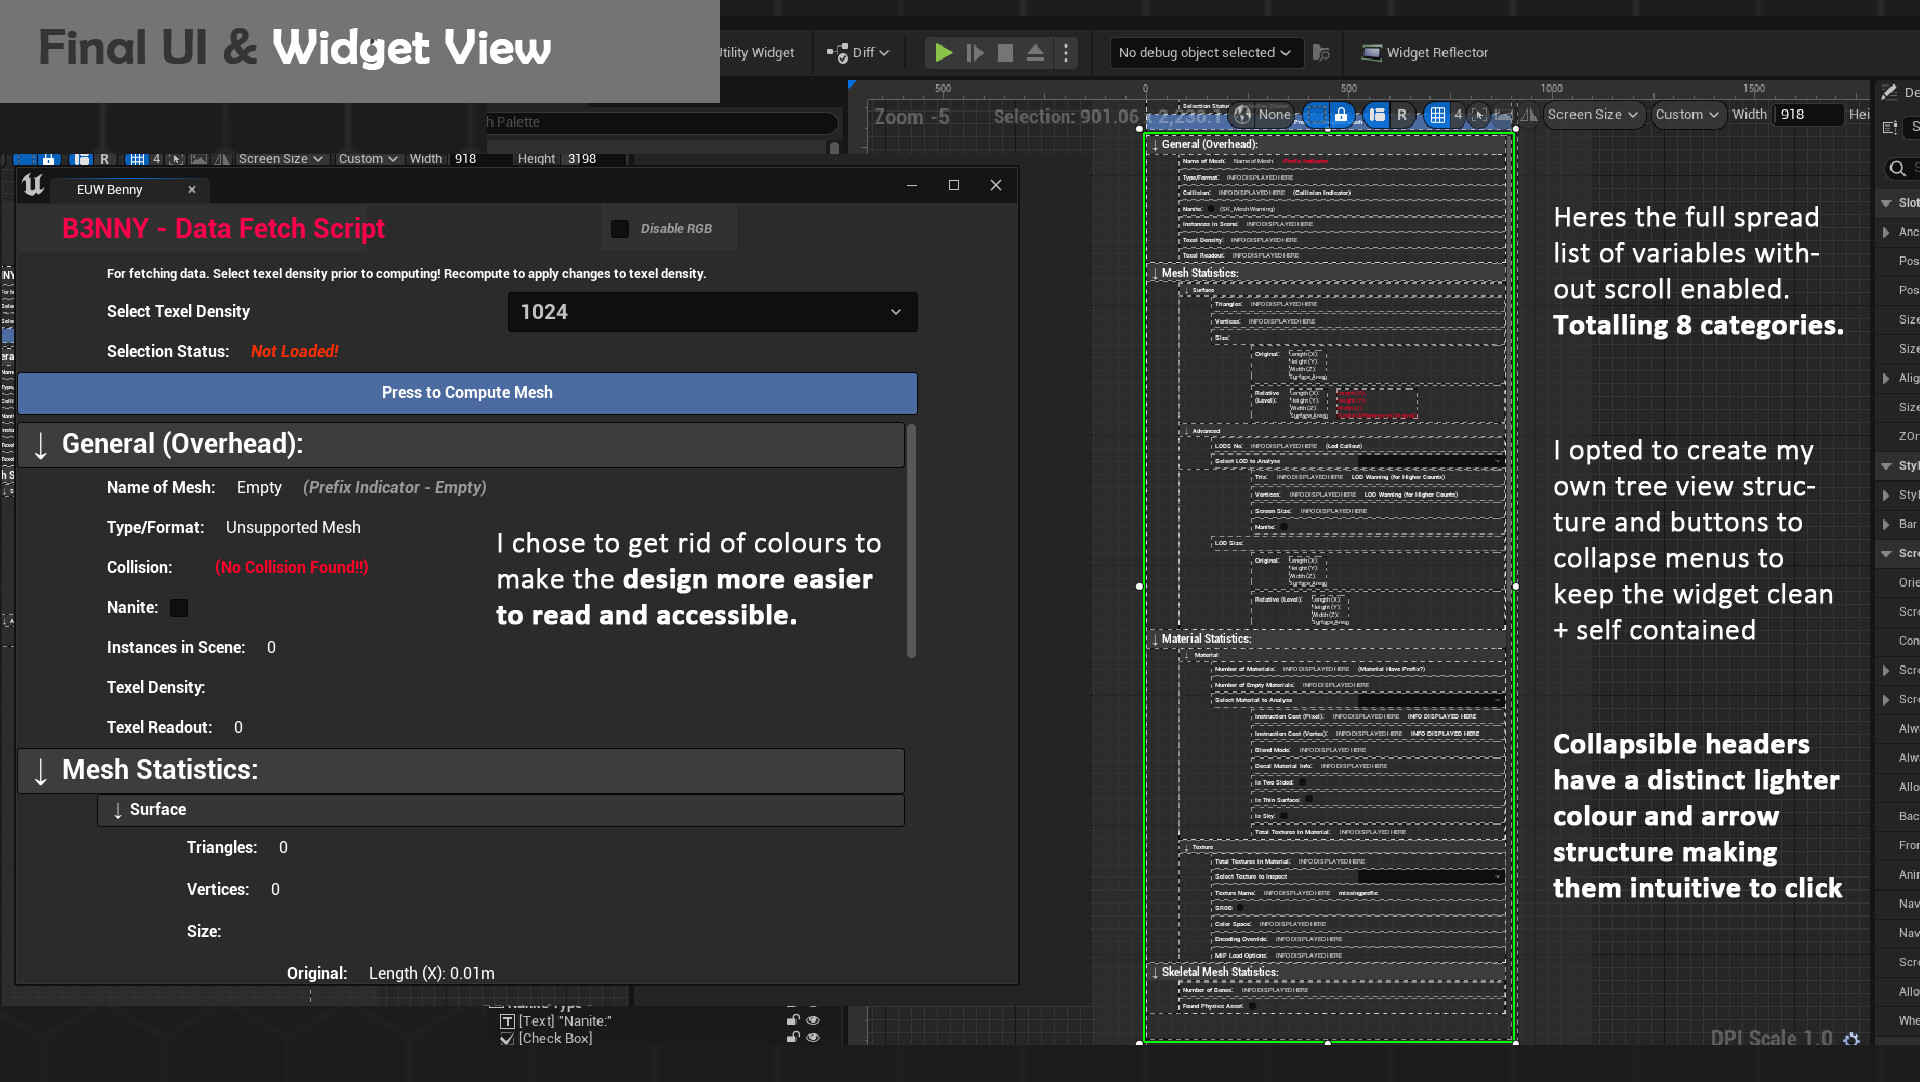
Here is the current finalised widget view. With a sleek grey layout and lighter headers all data is readable. You can even disable the RGB flashing title if it proves too distracting, but I have left it in for a fun little element of design. There are 8 collapsable menus to help keep data clean and if a user computed a static mesh element or skeletal mesh + vice versa and hidden. All data calculation occurs on the compute button, so the strain isn’t too performance intensive during runtime as nothing is constantly checked. A lot of additional branches have also been provided to skip data fetching as necessary if elements such as materials/textures are empty as you will see next up.
Full Look at the Event Graph:
Here’s the entire event graph in its glory. I will begin to break down all the logic below section by section so buckle up!

Blueprinting – Start of Compute

My graphs first go run a clearing mode where data is wiped from combo boxes, Booleans are reset, and arrays are cleaned too. This is due to some bugs during testing where if a manual wipe isn’t done at the beginning data would be added onto resulting in materials appearing across meshes that don’t have them if I compute two different targets. First, it’s important to determine that only one object is selected. I used a get selection node that counts the length to check that the number is no bigger than 1. Feeding a Boolean that is triggered preventing execution should this occur to be true. Following this the main selection checker occurs. By getting the selected objects class you can determine whether the execution will continue on the static mesh, skeletal mesh or bad mesh pipeline.
Blueprinting – Static Mesh
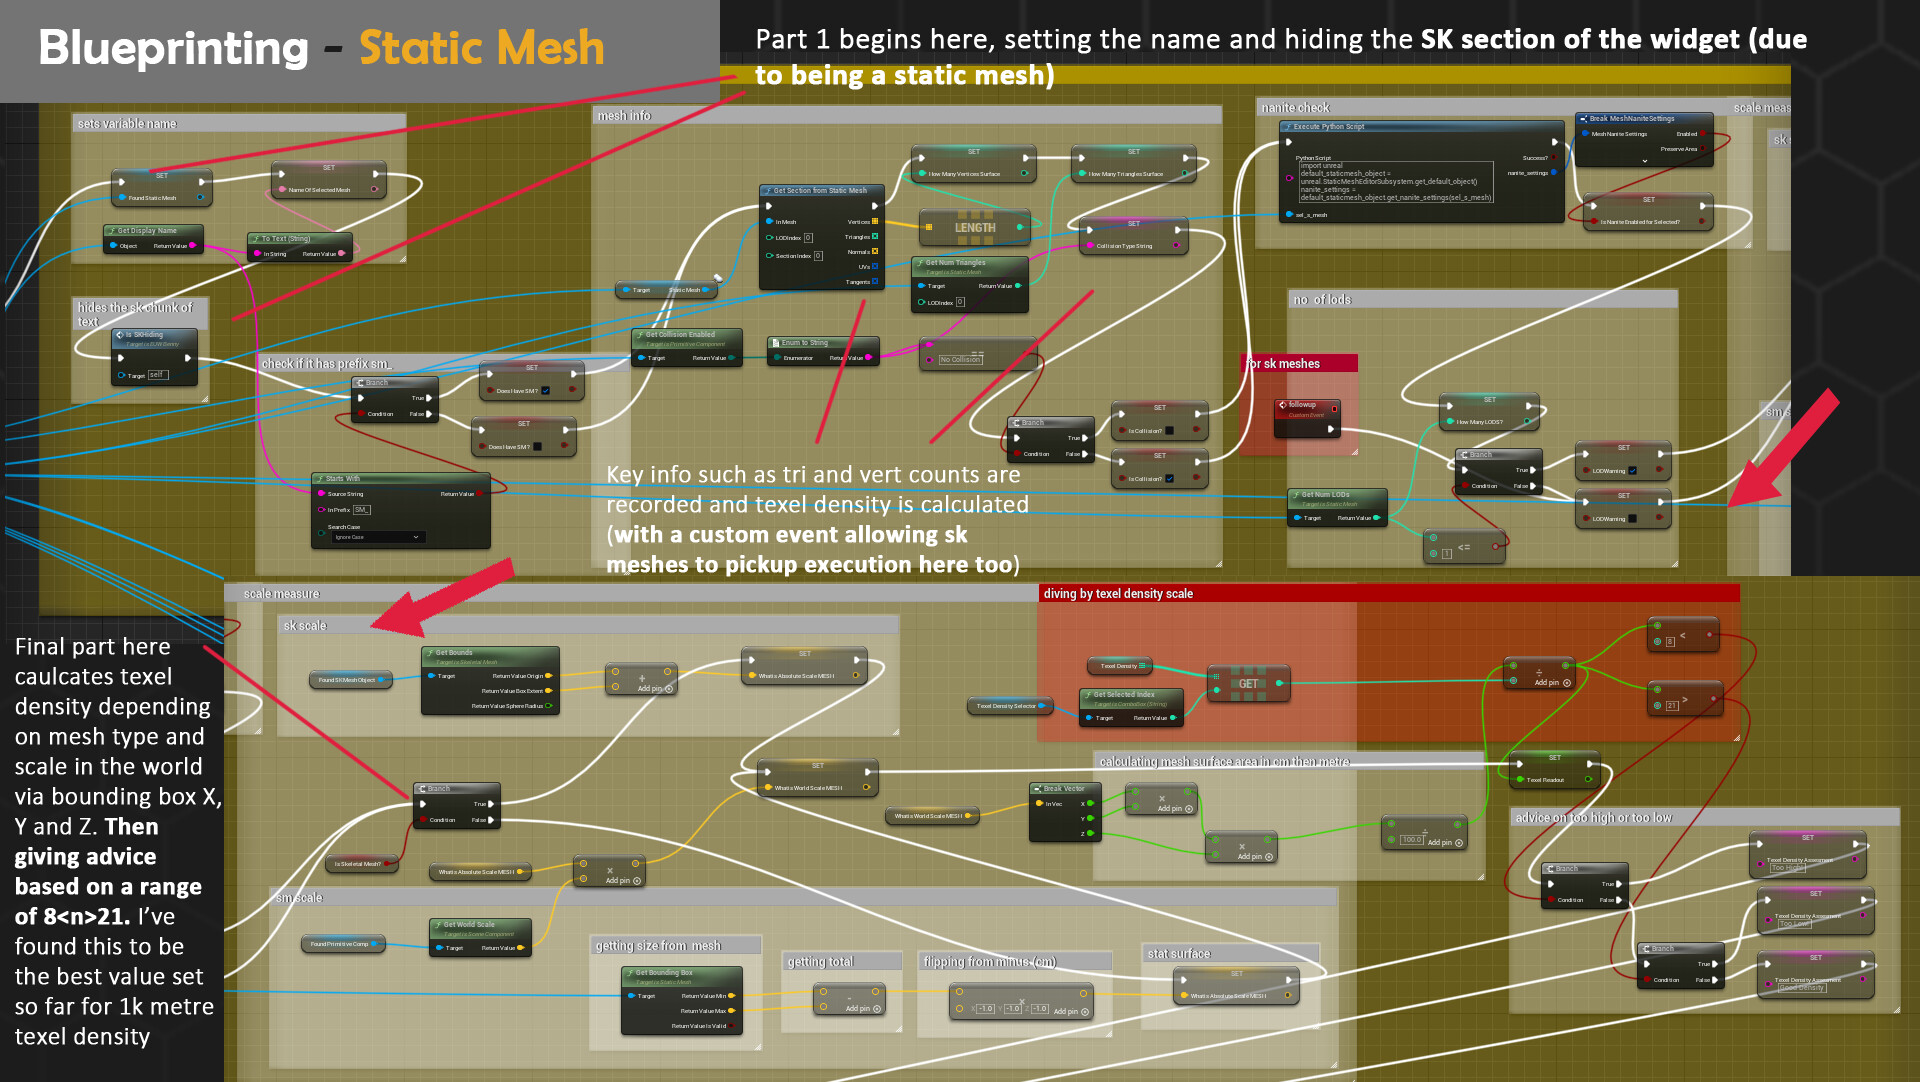
If the class is determined to be true for static mesh, we then look for prefix data. By checking the start of the display name, we can determine if there is a sm_ present. If not, a Boolean flag is triggered that then allows text to be flagged on the UI that no prefixes were found. Following on more important data is collected regarding the tri count, vertices and lod by using a get section mode. You may also notice a couple of set nodes; these allow me to reuse the call for this mesh in varying points of the graph for nicer housekeeping/cleanliness of lines. However, it also allows further on categories that only use primitive components such as get material and texture to not have to be doubled to account for skeletal mesh or static mesh variants. Moving on texel density is calculate through the world scale of the object being compared against the chosen density from the texel dropdown. I use the equation: (world scale surface area ÷100) ÷texel density=density ratio per metre. I then compare this value 821 for how high or low the ratio is. If the ratio is lower than means the map selected is too high, if the ratio is higher that means the map selected is too small. Between that value is good texel density for 1024 per metre which is standard. I tested this formula and tweaked results using the Unreal Engine cube and varying meshes. I may add a toggleable changer if you want lower or higher density however due to performance and visuals 1024 is industry standard for most games.
If you want to read more about texel density I highly recommend checking out Beyond Extents breakdown and math as the post heavily influenced how I constructed my blueprint: https://www.beyondextent.com/deep-dives/deepdive-texeldensity
Blueprinting – Materials

Following grabbing info for static meshes and beginning a custom event that grabs lods regardless of mesh type, we move onto materials. Materials are first counted prior to calculation and added to the combo box (drop down) array. I used this method quite a lot due to its reliable results to put names of each material, texture or lod in correct order. This data is then referenced further when selection is changed but in the primary first portion if 1 or more materials are detected then breakdown commences. The first being prefix check for either M_ or MI_ naming conventions. I also used the string length calculation to look for empty materials and tally up a score if there are unused slots on a mesh such as empty ids.

By getting the current selected index (the current selected material from drop-down) I can get the material instructions, shader cost and more data through a python script. There are two key differences between the preliminary shader cost calls as I realised pixel seems to refer to current rendered instructions whilst vertex compiles everything. This became more apparent when testing in my Pink Lady Diner scene as master materials have toggleable static switch parameters. Meaning not all instructions are used since some map adjustments, WPO or more is toggled off however still shows up in the vertex instructions cost count. As not all properties are available, I ended up consulting to a simple Python script that allows plugging in the selected material interface that is then combed through for editor Boolean tags of issky, is twosided and much more. These values help explain why some materials are more beefier instructions wise. Furthermore, you can also extract texture sample calls from this point which becomes very important up next to ensure only running the next portion if this is true to there being textures at all.
Blueprinting-Skeletal Mesh
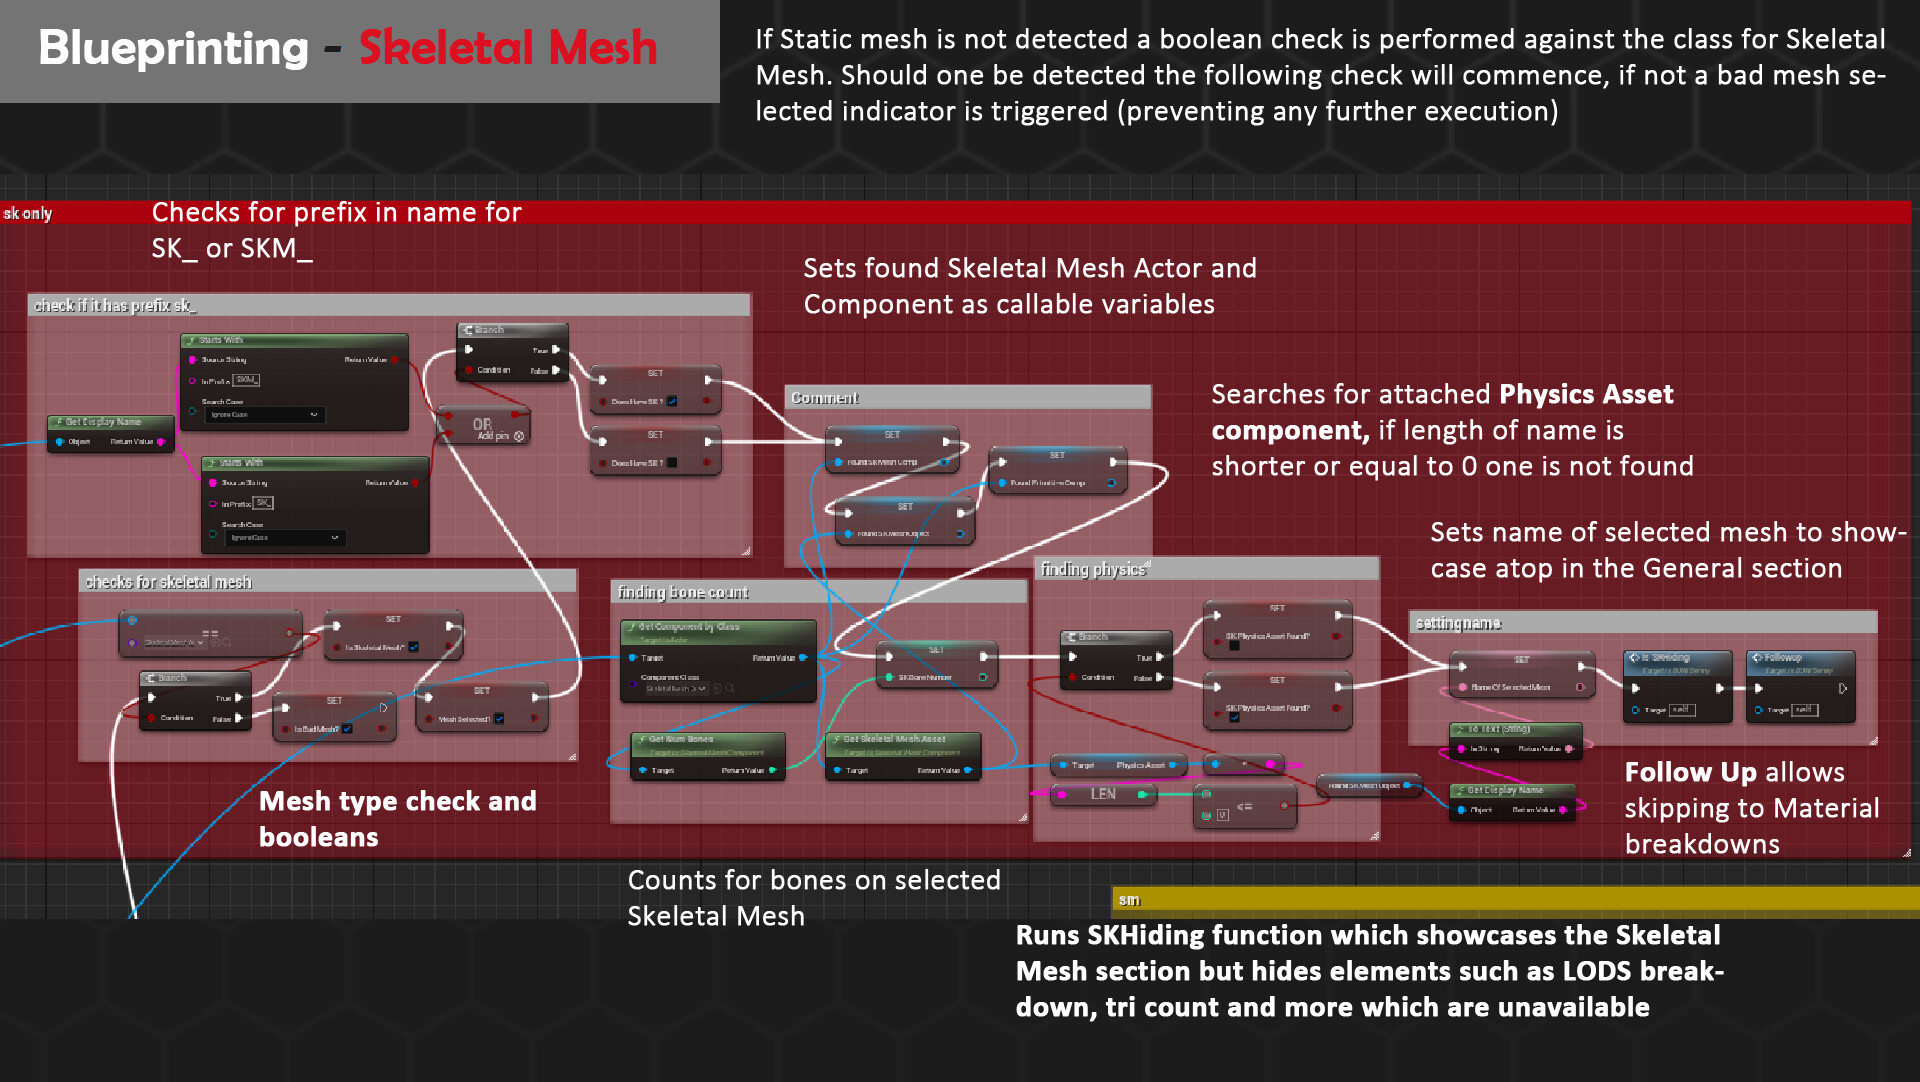
This is the alternate path to the static mesh route that eventually joins up on the material subsection by utilising a custom event, Follow Up. However, prior to all this some checks are performed to ensure that the mesh had a skeletal mesh component and is not an unsupported mesh aka bad mesh. A prefix check is then run on the display name for SK_ or SKM_ as I have also seen it used. Due to some limiting factors of data, I could get from a Skeletal Mesh no tri or vertices count could occur, but I did replace this by getting other useful data. Such as the total number of bones and if there is a present Physics Asset. A custom function is_SK also runs to hide all the mesh boxes that are not written to and reveal the skeletal mesh sections.
Blueprinting-Texture
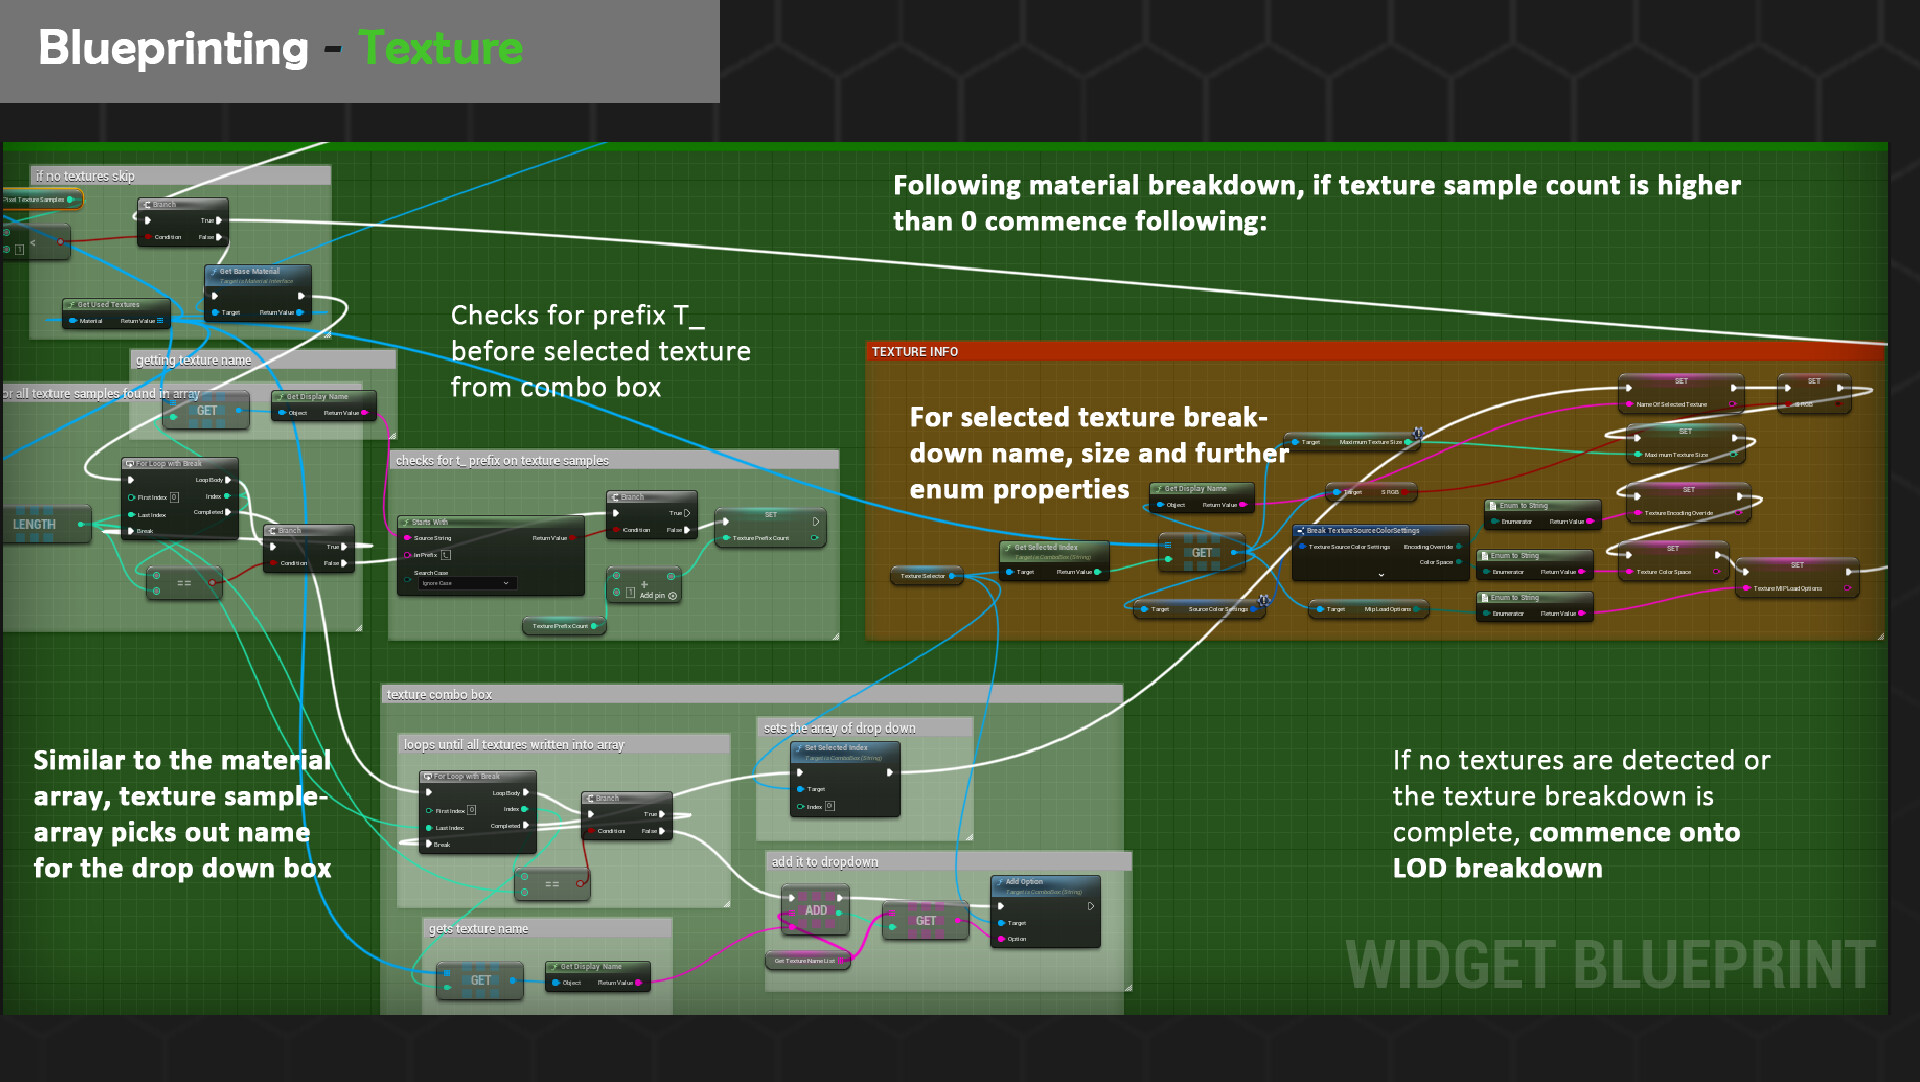
Following on from the materials checker, if texture samples are detected then the array writing algorithm is employed to put the results into the correct texture drop down box (combo box). The index is then set at 0 and this texture is sent forward to be analysed further for SRGB properties, mip mapping and more. Prefix detection occurs here too. Unfortunately, I could not get extra readouts of scale and size on disk to work correctly which is why these variables have been scrapped. I encountered a plethora of bugs that caused crashes due to this request alone which I suspect might be with how elements are loaded into memory. Fortunately, this data can be accessed with the Tools>Audit options so if needed to lookup you can still find more readouts here.
Blueprinting-LODS
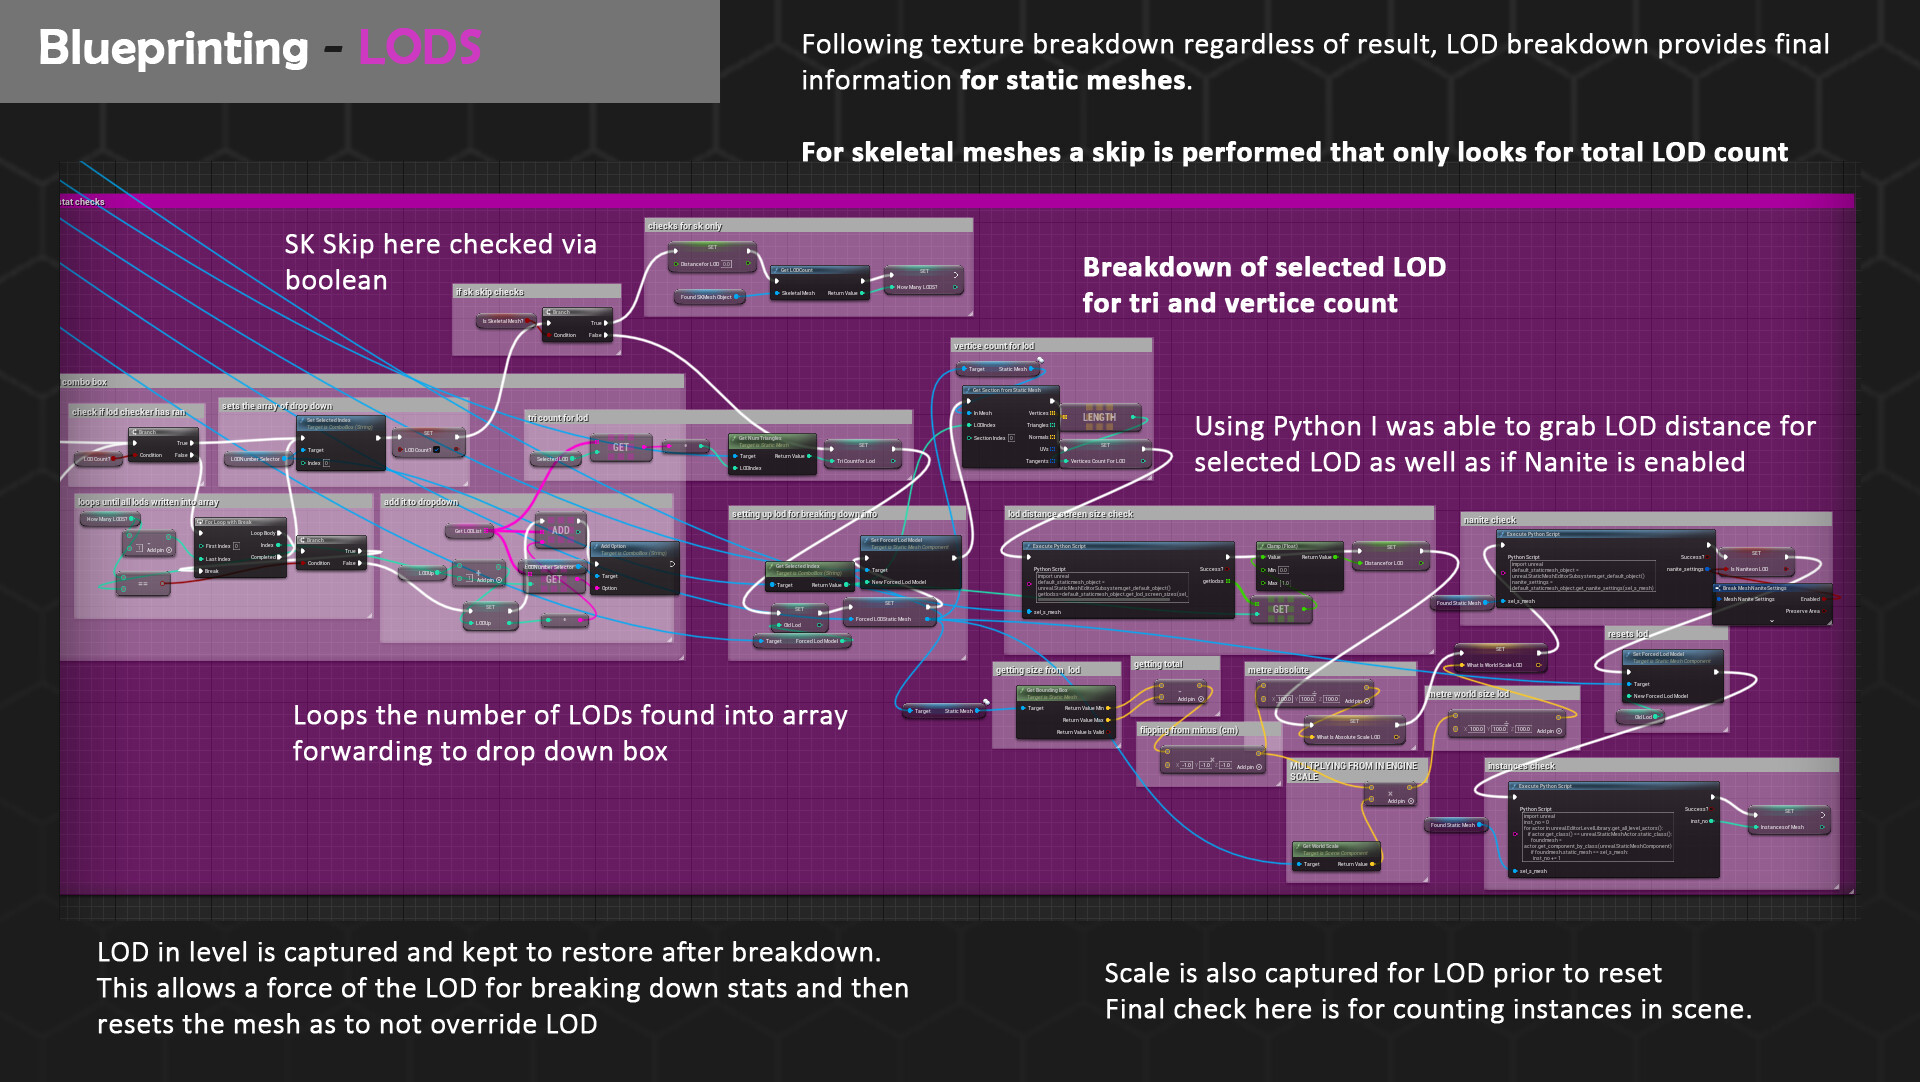
The final large lookup of the breakdown occurs here for LOD breakdown. This section works a bit differently in that it both supports and skips Skeletal Meshes. Due to the nature of a lot of meshes not even having LODS this combo box may only write 1 entry for the most part. The most interesting variable I was able to grab is the screen distance value of which the LOD pops in on. This can be viewed to be grabbed on the Python script by plugging in the selected LOD. Another unique feature of this section is that for the viewability of these additional LOD details I had to use force LOD to load these meshes in. However, an empty variable allows to keep the data of the original LOD on the mesh from scene so that it reverts back once the data is fetched + looked up. Utilising prior logic, tri and vertices count is fetched here too by breaking down the sections of the LOD. Should a skeletal mesh be found instead a branch takes a very different direction. The total number is still grabbed for LODS however distance is set to 0 as there’s no way to find this otherwise due to it being an unsupported mesh type from the Python side of things.

Drop Downs – Recycling Logic for Refreshing Selected Values
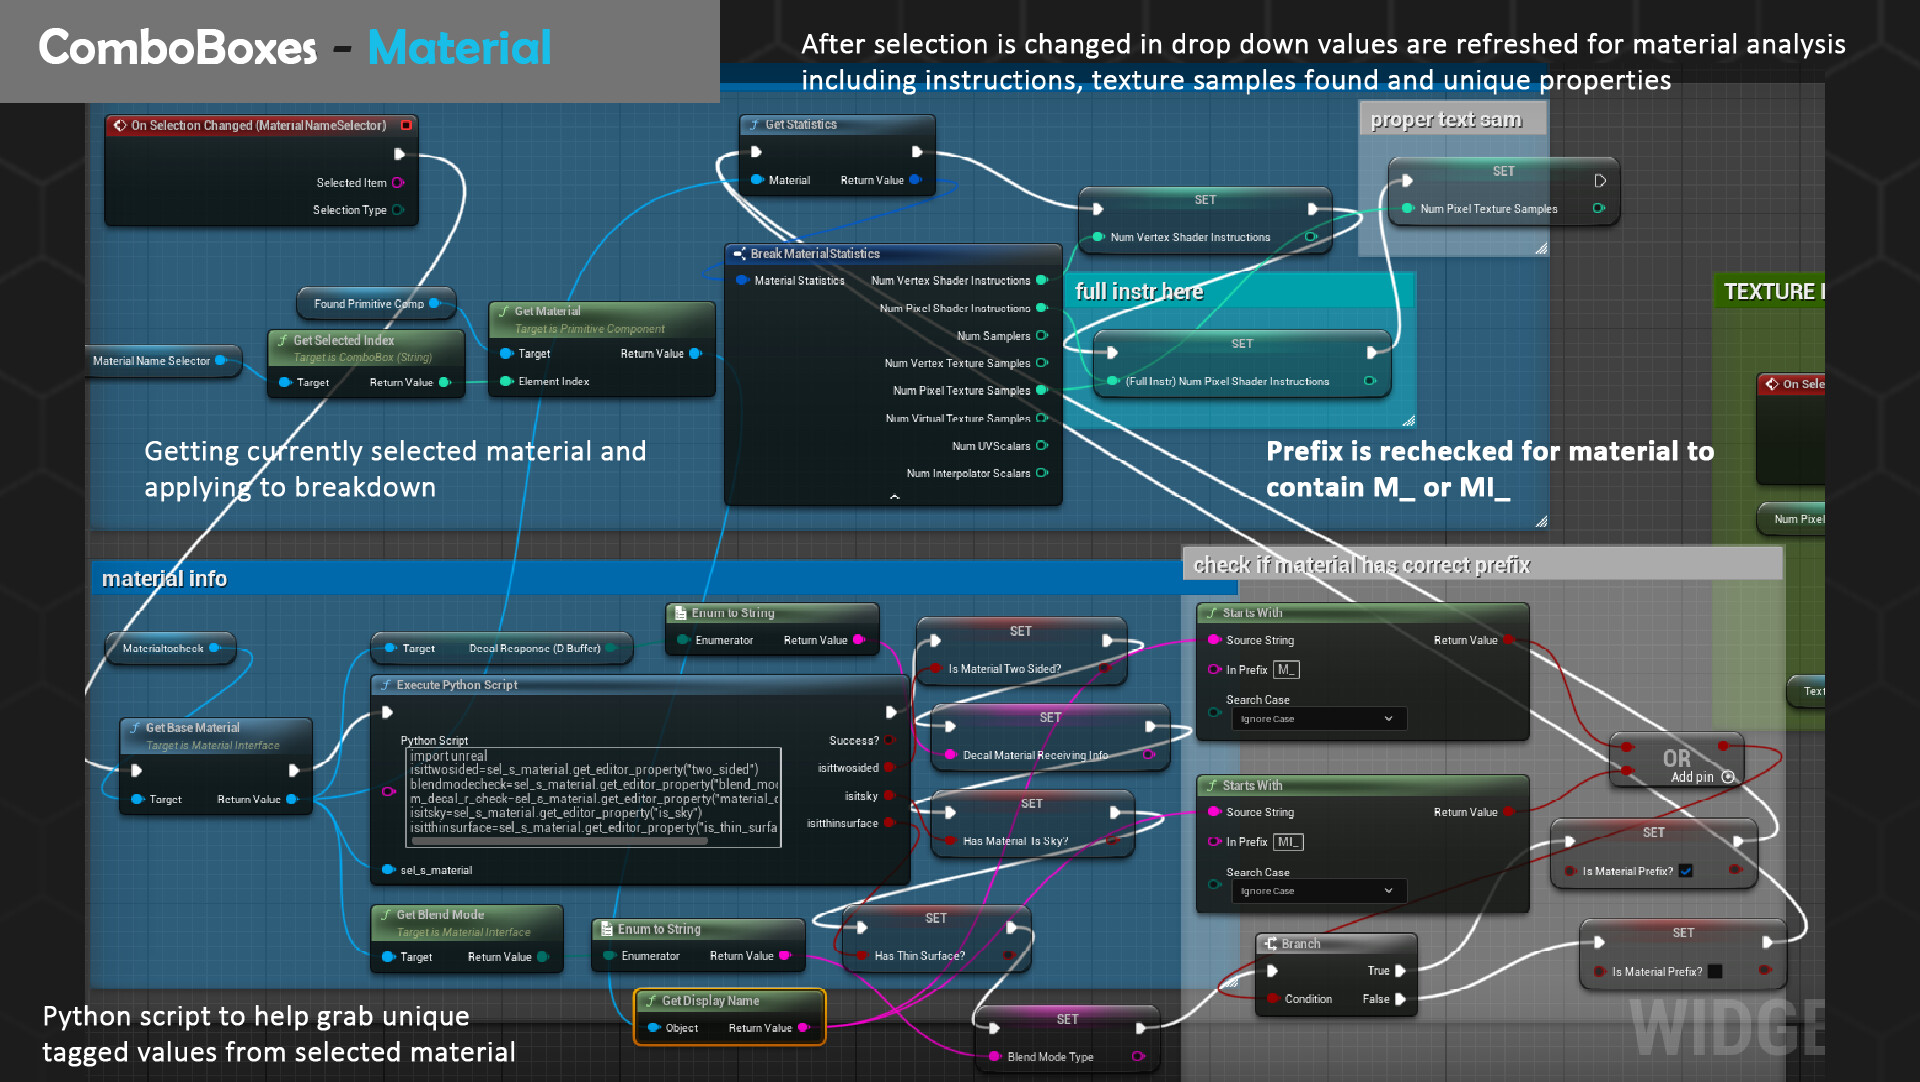
As you may already see if we only use the compute options, we run into an annoying predicament of having to compute for every change to a drop-down box. For most instances due to the clearing nature, it will not even remember what option was selected. Fortunately, the combo boxes (drop downs) have options to select events to run after a selection is changed. By re-grabbing existing nodes that look up parameters e.g. section breakdowns we can grab the selected index of the combo box to fetch appropriate data.
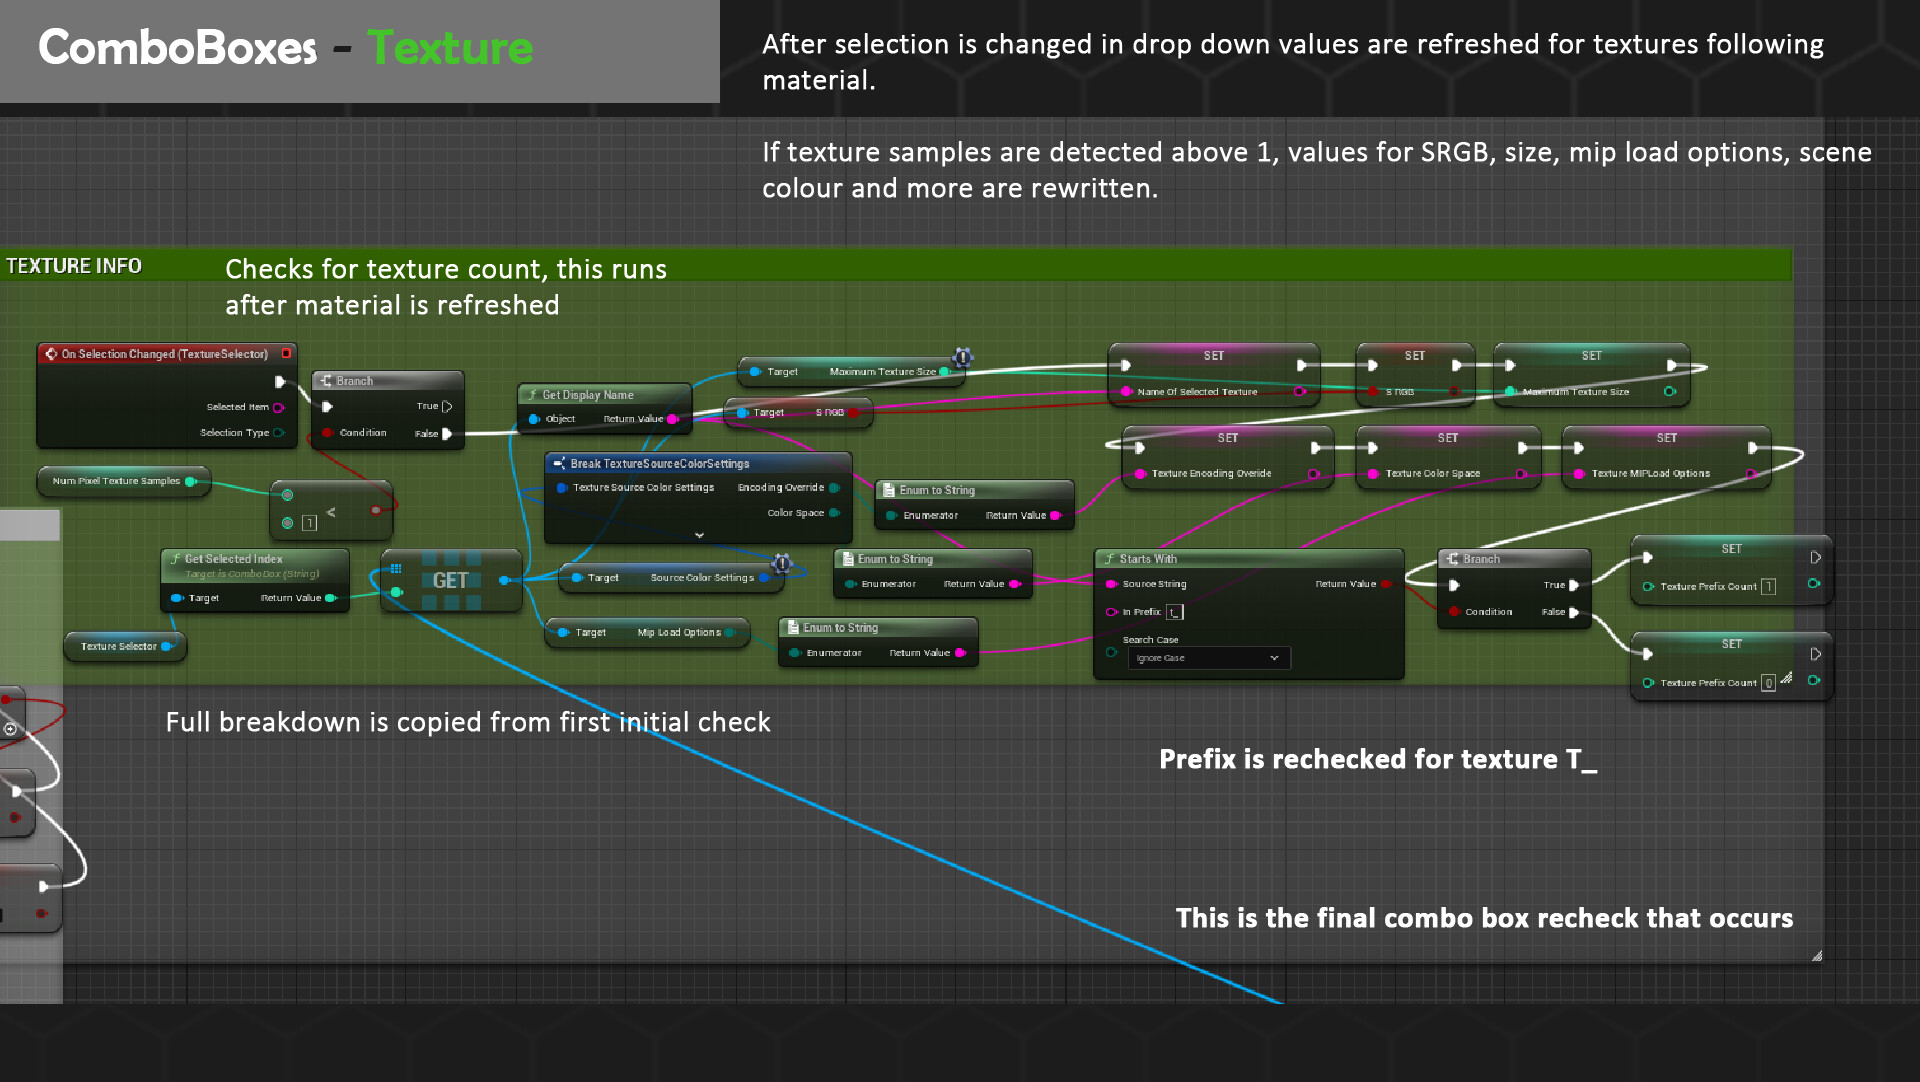
As all our info is already gathered in arrays fetching it for these breakdowns is relatively easy with the exclusion of some big crashing bugs that I had to amend first. As not all checks can occur if elements are missing say no textures, however the user still selects an index drop down value of 1 somehow or from a prior selection, the project crashes. I had to manually implement failsafe branches to double check if there are textures, materials or lods to even sift through so in worse case the event graph picks up a selection change it wont run. This fixed the majority of my crashes.
Collapsable Menus
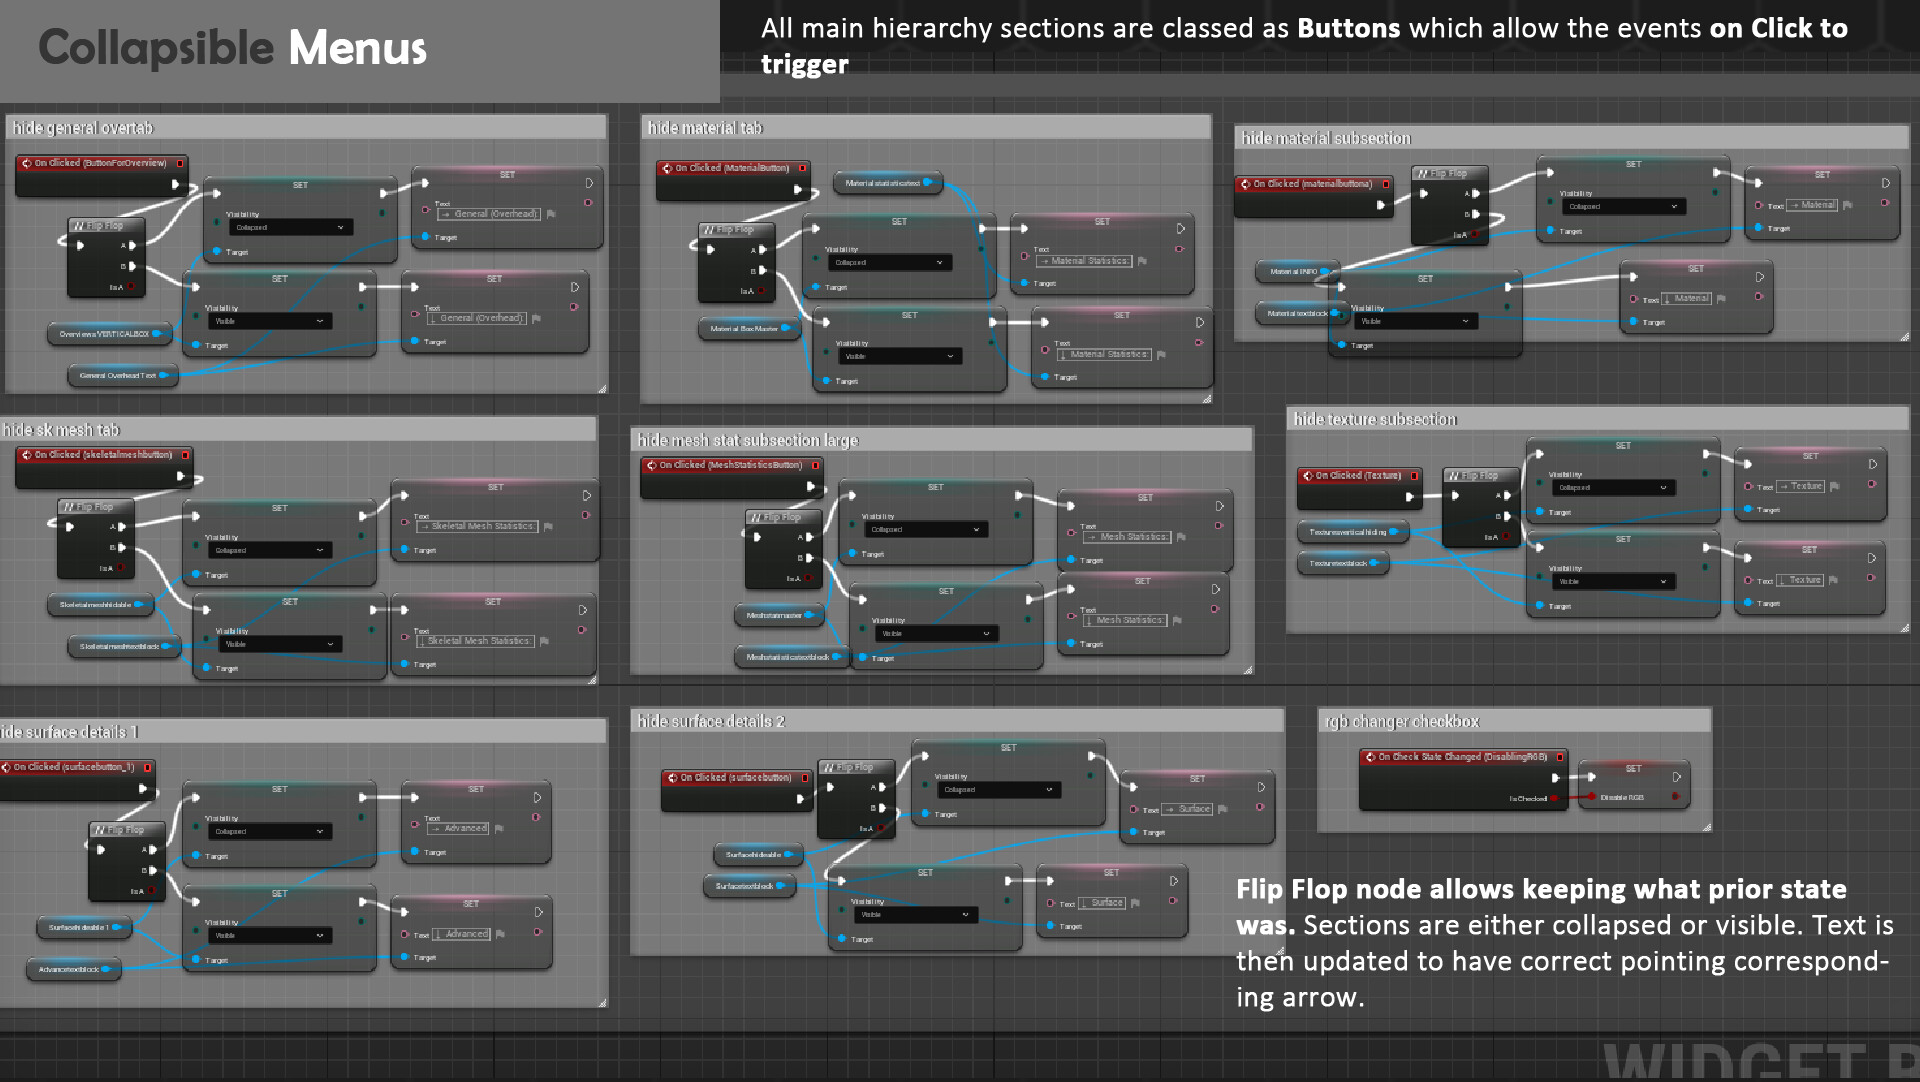
Initially I looked into tree view as an alternative to make collapsable menus however as previously noted it was not suitable with my widgets design goals. I also found this method to be more performative and easier to adjust by having two flip flopped states for hiding/showcasing elements. The logic was easily replicable across all events of on button click for the sections with the amendment of changing the text that would update the arrow direction.
House Keeping Nodes
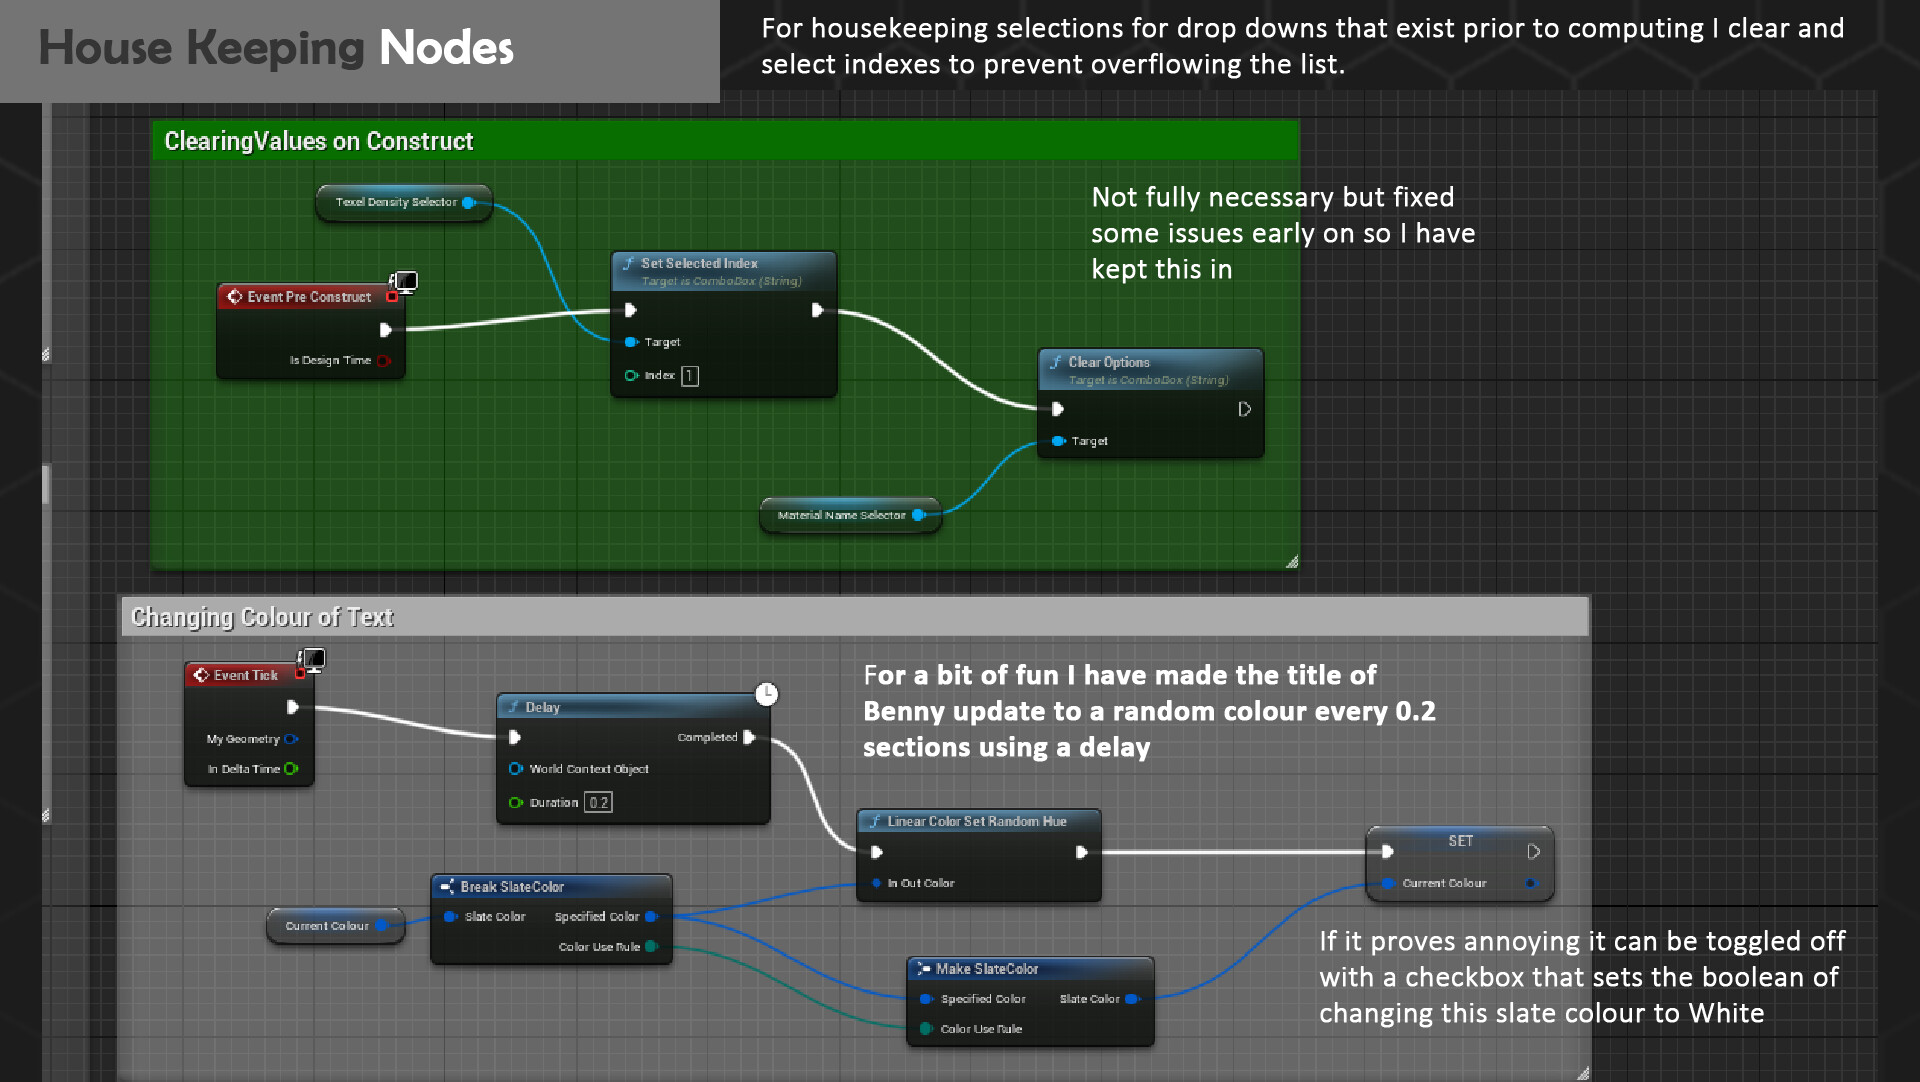
Due to the flow of logic some combo boxes had to be forcibly cleared as such the material box. However, I ended up encountering bugs that made the widget confused as to what the default index should be for elements such as texel density which would thereafter break logic using it to calculate math. So, I had to add some extra nodes to set these prior to construction, being careful not to overload this section as it would mean a longer run setup. I also had a little bit of fun by adding the header name Benny to change colour using some random hue logic. To maintain accessibility, I implemented a checkbox that would toggle this to a forceful white however you too can experience a bit of rainbow Benny on startup.
Bugs Encountered & Fixed
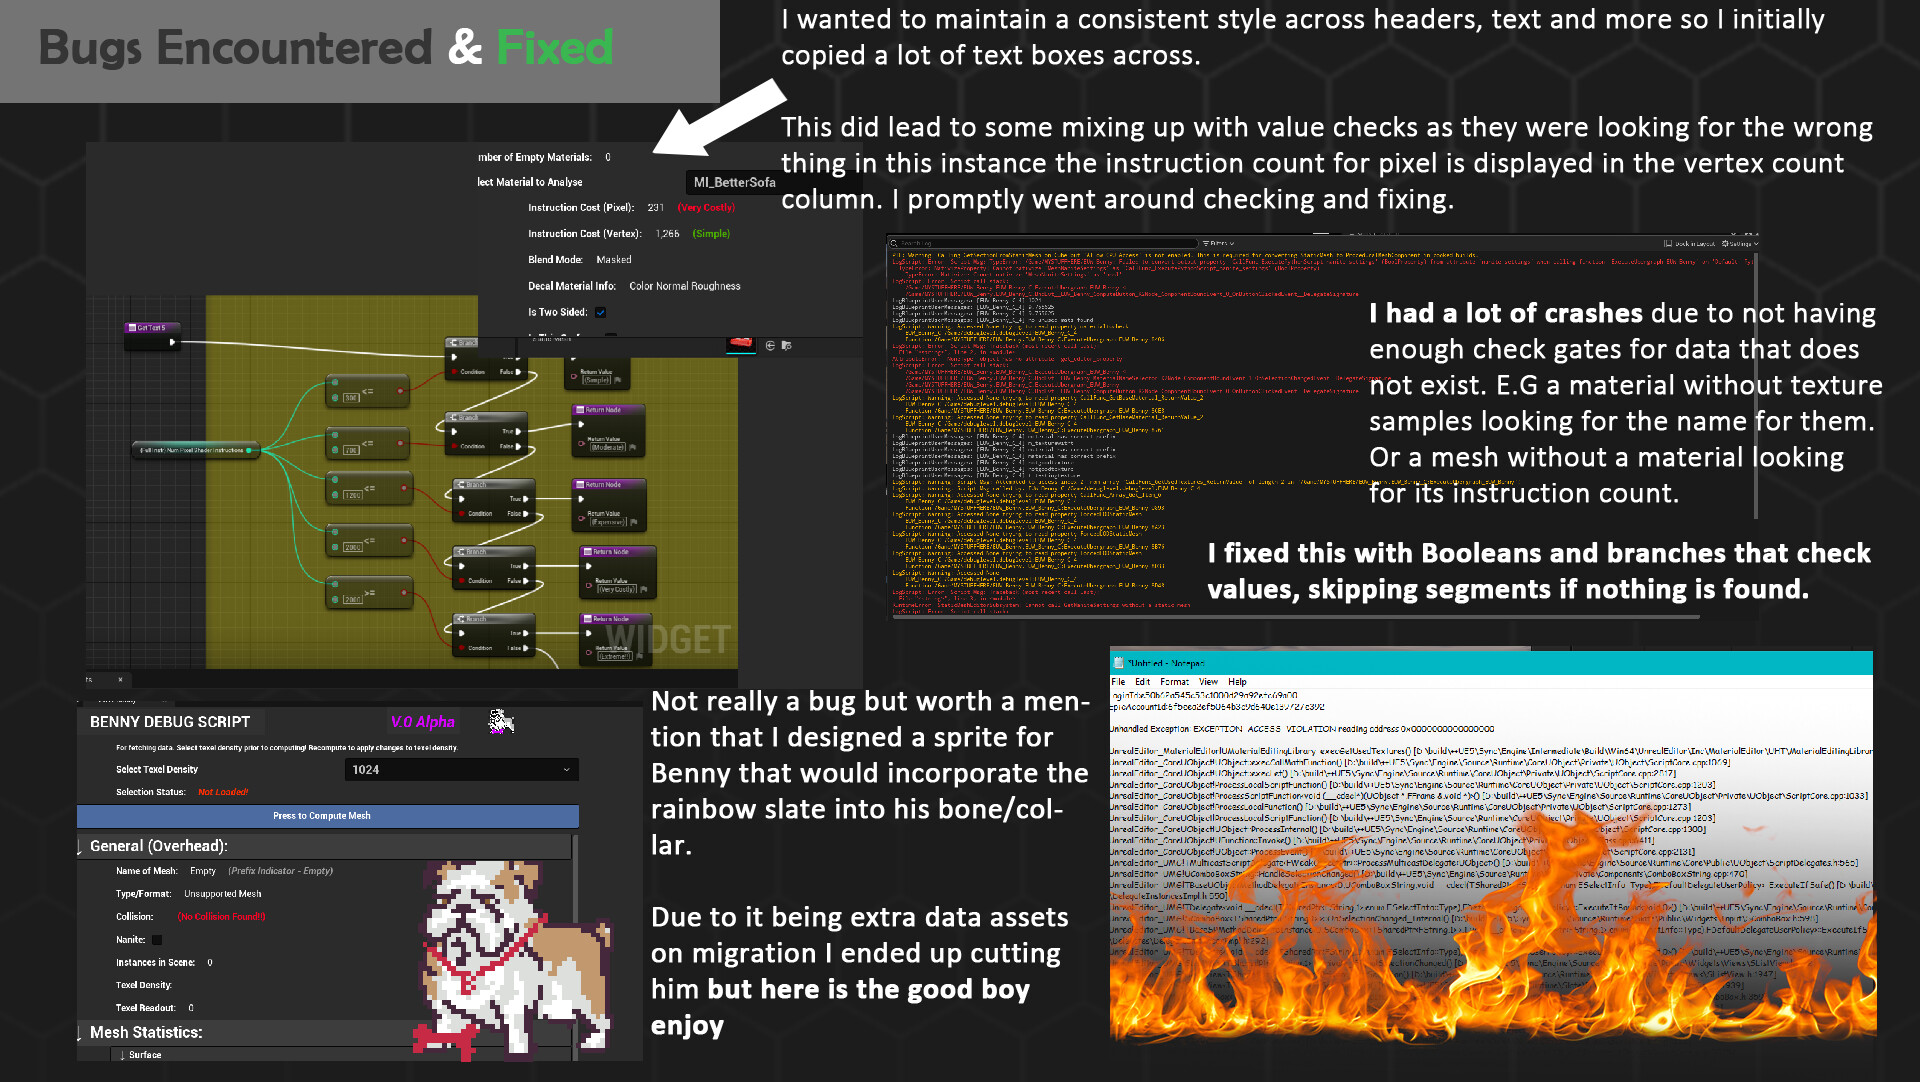
Due to this being my first time working with both Editor Utility Widgets and the Python Unreal Engine API there was a lot of crashes. For the majority of these bugs, I had a crash log readout to consultant that would tell me a variable would be looked prior to existing for example the textures being read on a material that doesn’t actually have a texture. By then having logic that acts on the assumption of there being a texture sample it crashed immediately. Other notable mentions are the Python APIs specific calls for Static Mesh actors. I had incidentally plugged in a Static Mesh Component, which appeared the same blue as the actor that had me very puzzled as to why I was not getting a readout of my Nanite and Instance checkers. I at one point was convinced my entire script was wrong however when I tried to run exemplar scripts it too refused to print out what I wanted. Secondary honourable mention that was lightly comedic was that Python has two grab commands for level assets and content browser assets. Prior to plugging values in I figured I must have to get them anew and was puzzled why the widget kept being picked name wise and exploding in errors. Turns out it was picking Benny as it was the selected widget in content browser, and I needed to alternate to the level editor actors instead of getting all actors. Here’s also a scrapped sprite I made in Asperite for Benny that ended up getting cut as once again it meant a harder migration between projects.
Python API Link - https://docs.unrealengine.com/5.2/en-US/PythonAPI/
Final Showcase:
Check out the full Artstation post to see Benny in action: